Saturday, January 23, 2010

The Great 2010 Sewing Agenda.

I am setting some sewing resolutions this year. They are focused around vintage dresses. Just over two years ago I began my foray into sewing, always with the goal of sewing beautiful vintage dresses. Well, after two years, countless sewing classes, and a few successful garments under my belt, I am finally ready to take the plunge and conquer dresses. And of course there are a few non-dress projects on the agenda two.

Below are my top six projects in priority order. I already have the fabric and notions for three of them. And the good news is that two are currently underway. The patterns have been tissue fit and adjusted, the muslin fabric has been cut, and the machine is threaded. I am optimistic and enthusiastic to learn new skills and expand my sewing repertoire. Most importantly, I am excited to wear the finished garments.

2010 may be the year of the Tiger according to the Chinese zodiac, but for me, 2010 will be the year of the Vintage Dress.

The Great 2010 Sewing Agenda:

The Shirtdress:
The classic shirtdress is the style that started my love of vintage patterns, and it has been my greatest aspiration since learning to sew. This year is the year of the shirtdress for me. There are so many gorgeous versions of the style, but this is my favorite to date. This is a riff on the classic button-front dress with a collar, but with a more interesting skirt and neckline. For my first version, I am making the dress as pictured. But the pattern does come with a collar too, and eventually I may graduate to that version as well. But all things in due time. For now, this is on the top of my to do list.


The 1950's Collar Confection Blouse:
From my favorite modern pattern designer - Decades of Style - this blouse promises something that can mimic the finest Anthropologie ready to wear. It's the little details that make it so special, the little cap sleeves, the waist tucks, the buttons up the front, and of course that drooping, floppy collar. If this blouse works out once, it is bound to become a staple in my sewing repertoire.

Sheath/Wiggle Dress:
I cannot lie, my entire inspiration for making this frock comes from the movie An Education, where the star wears a pretty neck-bow sheath number like this. The pattern looked so similar, and I found an utterly amazing cotton silk watercolor effect fabric to create a similar look. Some people find the bows too sweet, but I find them very feminine. It is not fair to call this a wiggle dress, as I am certain I will need to widen the hem to balance my top heavy proportions, but I have high hopes. In fact, I have some weddings to attend this summer, and this might be just the right dress, with sexy high heels.

The Portrait Blouse:
I was inspired to create a portrait blouse thanks to blog by Gertie, who is focusing on patterns from Vogue's New Book for Better Sewing. The first featured project is a portrait blouse, like this. It is so pretty and simple. My pattern is not identical, but I think the bodice has the necessary elements - a side dart and bust dart for good fit at the waist, the wide neckline in the front and back, and the one piece cap sleeves. I may need to modify slightly for release darts, or darts that will fit the material at the hits and allow material to blouse around the bust, a la Gertie's pink version. Plus, I love how the book describes the blouse, "Under the sun or under the stars, the portrait-neckline blouse has a way of making you look your prettiest and most feminine."-- Vogue's New Book for Better Sewing

The Summer Sundress:
I can't lie, I see this one done up in a variety of summer prints, most notably in a flirty print with tiny pink and red strawberries dotting the fabric, like this or this. I expect the shoulder pleats to be immensely flattering to my bust. I hope the six-gore skirt will have a floaty effect that welcomes a cooling summer breeze. Shoot, I can already see myself at the farmer's market, wicker basked full of fresh veggies in hand (and I don't even own a wicker basket....yet). And who knows, maybe I will even send away for a self fabric belt to complete the look?

The Contrast Yoke Dress:
This was one of the first vintage patterns I ever purchased, but it ends up low on my list because of the complications of altering for a full bust with that neck yoke. However, I just think it has such potential. Imagine a bright pop of color lining the yoke to pop out from the little neck detail.

Tuesday, January 12, 2010

From the depths of my stash.

Maybe you remember these fabrics, although I would not hold it against you if you don't. They were purchased back in June of 2008, more that a year and a half ago. They are Liberty of London tana lawn cottons with matching silk/cotton lining fabric. They are beautiful. Absolutely beautiful. They are washed and pressed and ready to sew, but I have been holding them for over a year and a half.

I keep holding them for two reasons. One, they are so pretty (and expensive) that I am afraid to cut into them, for fear of ruining them. Two, I am not certain I made a good choice on the patterns. Sure, they are pretty to look at on the bolt (or in my fabric closet), but how will they look on my body? My hesitation comes down to the fact that these fabrics are so nice, and also so bold, that I am unsure what to do with them.

However, I am determined to do some more (successful) garment sewing this spring, starting with items from the stash. I am thinking some basic blouses might do the trick. I had hoped to use patterns I already own, but I am just not sure I have a pattern appropriate for these prints. So now I am obsessing over ordering a new pattern. I am especially thinking about this pattern from the lovely Colette Patterns line.

What do you think?

From the pattern envelope, a "Simple, versatile blouse perfect for creative embellishment, with deep tucks at the front and back waist for a loose but curvy shape great for tucking in. Version 1 closes with back snaps, making it easiest to sew. Version 2 has neckline tucks and buttons up the back. Version 3 has a keyhole neckline with tie closure and buttons up the back."

The blouse is just so lovely on the model, because it seem loose and comfortable, with just the right amount of shape and detail to keep it tidy. The one think I am a tiny bit concerned about is dong a full bust adjustment, because it likely means putting a side dart into the pattern. I do not want to disturb the dolman-style cap sleeve, and I certainly do not want to cause any odd armpit bunching (refer to the Everyone's Favorite Claire McCardell disaster).

My other concern is the thought of purchasing another pattern. My husband has started to enforce a sewing purchase crackdown, and I can't blame him. The poor guy suffers so at the hand of my sewing hobby. He worries and frets every time I come home with fabric and patterns and grand plans for creation. In many regards his concern is justified. Sewing is truthfully a pricey past time, made more pricey by my expensive taste and my propensity to hoard. While I have made some nice pieces from the discount area at JoAnn's, the truth is that I lean much more heavily toward the luxury items, the out of print patterns, and the lavish notions like real shell buttons. And on more than one occasion my attempts at grandeur have resulted in disaster, which also equals a waste of money (and also a worthwhile learning experience). So, I understand why he is concerned and why he does not want me to order more patterns.

But even still, I cannot stop thinking about this blouse. I am filled with optimism that it is the right choice for my fabric, my skills, and my figure. Below are more images of the lovely blouse, sewn up in all of its many splendid version. I am very smittin' with the key hole version, and look how they button up the back! Since my fabric is rather bold, this simple, classic silhouette may be just what I need. I think they will work will with trouser jeans and a cardigan, or even on their own in summer.

I look forward to your feedback.

Sunday, January 10, 2010

Things that make you go "ewwww."


What you may ask, is that? The meat feature above is none other than lengua, or beef tongue for those of you that don't speak Spanish. Below is smoked neckbones, from pork. Both are discoveries from our recent Great Lard Quest of 2009. As you may recollect if you were reading in December, I demanded lard for homemade biscochitos. The search for lard was more challenging than you would expect.

You see, we needed fresh lard. Not the hydrogenated stuff sold shelf stable in the shortening aisle of the standard grocery store. So we went searching. First, Sam brought home a tub of manteca, or lard, from the La Fiesta grocery near his work. La Fiestas are some of the only non-HEB stores in San Antonio, and they are much smaller and tend to cater to a Hispanic clientele, so naturally we thought their lard would suffice. But the lard was sort of brown in color, runny in texture, and in general not as immaculate as I imagine. So that night we went on a long quest to find more lard.

First, we went to another La Fiesta. This store did have lard similar to the liquid brown lard Sam had brought home. Only this time it was labeled as derived from pork skin, which means it is a bi-product of making chicharrons, or fried pork skin for your northerners. That explained the color and consistency of the stuff already in my fridge. But I wanted snow white leaf lard, of a quality for baking, so our quest continued.

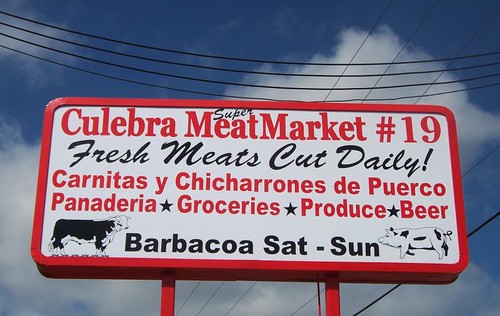
Next we headed down the street to the Culebra Meat Market, which felt like stepping into another time and place. The Meat Market smelled like, well, like a meat market. It did not have the bright, astringent Clorox smell of my local grocery's meat section. Rather, it smelled like raw meat. Not dirty or unclean, but certainly not as sanitary as my usual experience. And there was so much meat in the place, with different cuts and and names than what I am accustom to ordering. No one at the meat counter spoke English, so when I tried to order two cups of lard, I receive two tubs of manteca from the back. Then, in trying to return one, I was misunderstood and brought a third tub. After all of the confusion I felt I had to buy at least one tub, even though I was still unsure about the product. While it was more "lardy" looking that the stuff from the La Fiesta, it was still more liquid, and slightly darker in color, than the lard I had researched on the Internet. Also, it came in a totally unlabeled container. I am used to my nutritional information and expiration dates on all products, so fair or not, I was suspicious of the Culebra Meat Market lard. But for only $2.50 I become the proud owner of a second 20 oz. tub of manteca, and off we went with a clean conscious about using the employee's time.

With still no perfect lard in our possession, we headed to the last and biggest bastion of Hispanic shopping that we thought might be open at 8:30 on a Wednesday night, the HEB El Mercado market on Culebra (not to be confused with the Culebra meat market, not actually on Culebra but on Blanco). The El Mercado caters to a specific audience craving the more traditional open air Mexican market from Mexico, and the first thing that makes this HEB different is the fact that there is a huge circus tent covering the entire front driveway of the store. Under this tent are spaces for raspa vendors selling Mexican snow cones, vending machines and picnic tables

Walking into the meat area, the first thing I saw was a full cooler of frozen pig heads, at least 25 of them shrink wrapped and frozen and waiting for some amazing roasting or cooking process at the hands of an authentic cook. Along the meat wall, halogen lights highlighted an array of different and somewhat ghastly shrink-wrapped organs, like tubs stuffed with chicken livers by the pound. I sighted familiar yellow Styrofoam shrink wrapped trays, but loaded with the unfamiliar sight of chicken feet. There were tough smoked pigs ears for chewing, and even some hoofs for I am not sure what.

We found packages of giant beef tongues, as you can see. I couldn't resist, I had to pick it up. Sam and I have each eaten lengua before, and it is tender and flavorful, but it was still a sight to see it raw and whole. If you look closely at the tongue in the photo, then behind it, that little white sign says "Fresh Beef Cheek Meat." That cheek meat is probably used for barbacoa. The white packages directly behind the lengua, well, that's tripe, otherwise known as stomach lining. It is used to make menudo, a classic hangover remedy sold in taco joints all over San Antonio on Sundays. I have never worked up the nerve to try menudo. Maybe someday.

Would you believe it though, the El Mercado did not carry lard. None. Nada. So we purchased a package of the hydrogenated shelf stuff, despite my better judgment, and I went home to assess my 60+ oz. of various lard products and decide what to bake with.

The good news is that the Great Lard Quest of 2009 finishes with a happy ending. I ended up using the manteca from the Culebra meat market, straight out of the unmarked tub, with good results. The next time I need lard, I plan to work ahead and place a special order from a local butcher, so I can request the pristine fat from the kidney area. It means rendering it myself, but I am certain to get what I need. And if ever I become curious about offal and uncommon meat cuts, I now know not to look to my usual butcher, but a bit further down the road to the Hispanic markets that do not have lard.

Wednesday, December 30, 2009

Christmas cookies redeemed.

Sam and I spent Christmas in San Antonio with just the two of us for company, which was wonderful and calm and relaxing. Except for one thing. On Christmas Eve there was a definite lack of Christmas cookies in our house. With only two of us, I refrained from much baking this year. After all, the two of us alone hardly needed tins upon tins of sweets. But, at 7 p.m. on Christmas Eve, I just felt like something was missing. It wasn't that I was lonely, but I was worried about having an empty plate for Santa. So I baked cookies.

In fact, I baked two batches of cookies. At least I restrained myself from doubling the batches. The first was an old classic and family favorite known as Russian Tea Cakes, or Mexican Wedding Cookies, or even sometimes butterballs (due to the excessive and delicious butter content). The second cookies was a new recipe, not designed especially for Christmas, but it has become my new favorite Christmas cookie. It is orange shortbread sandwiched together with chocolate ganache. Yum.

I like to focus on citrus for Christmas. It reminds me of Little House on the Prairie. During their Christmas on the cold plains, both girls get an orange in their stocking, and it is such a treat during that winter in their little house on that big, cold prairie. These days we all take our citrus for granted. But just think, little Laura and Mary each received one orange, which they cherished section by section. At my house we currently have a five pound box of Mandarin cuties, and I peel three or four a day if I feel like it (no scurvy here!). And their oranges were not even genetically modified to eliminate seeds!

The cookies are minimally sweet, rich with the ganache, and have a heft that makes you feel like one is enough. The orange provides a sweet scent and a demure, delicate flavor that compliments the chocolate filling. The sandwiches are also sturdy with a good shelf life, which makes them a great choice for the holidays. You can easily whip up a triple batch to package for friends and family without fear of spoilage or crumbs. We ate ours up to a week after baking, and it was only at day nine that they lost their luster. You could also make the dough alone as single cookies, sprinkled with sugar and served up with tea or wassail or just a cold glass of milk.

Next Christmas Sam and I may find ourselves surrounded by family, or with friends, or again sharing each others quiet, lovely company along. But no matter who we spend it with, there will be homemade sweets and this cookie. And every time I eat it I will remember Little House on the Prairie, and the simple pleasures in life, like citrus and a warm home on a cold night and a family that cares whether near or far. They are simple pleasures that should not be taken for granted. So, until next year, happy holidays and good luck with the New Years Resolutions.


Orange Shortbread Cookies
modified from Bon Appetit, with the addition of chocolate ganache for sandwiches

1 1/2 cups all purpose flour
1/2 teaspoon baking powder
1/2 teaspoon salt
1/2 cup (1 stick) unsalted butter, room temperature
1/2 cup sugar
2 teaspoons (packed) grated orange peel
1/2 teaspoon orange extract
1 large egg yolk
3 tablespoons whipping cream

Position rack in center of oven; preheat to 350°F. Butter and flour large baking sheet. Whisk first 3 ingredients in medium bowl. Beat butter, sugar, orange peel, and orange extract in large bowl until fluffy. Beat in yolk, then cream. Add flour mixture; beat until dough comes together in moist clumps.

Gently roll dough out to ½ inch sheet and cut circle using biscuit cutter. Place on baking sheet, spacing 3/4 inch apart. Bake cookies until golden, about 18 minutes. Transfer to rack; cool.

When ganache is cool and think, spread generously on cookies and gently sandwich together. Pack into cute Christmas tins if desired and deliver to friends and family (recommended).


Chocolate Ganache Filling

1 1/2 cups (12 fluid ounces or 360 milliliters) heavy cream
1 lb (454 grams) semisweet or bittersweet dark chocolate

In a heavy saucepan, boil heavy cream. Turn off the heat. Add chopped chocolate pieces and let it rest until melted. Use a rubber spatula to stir the mixture until all the pieces are melted.

Pour it into a room-temperature bowl and cover with plastic wrap. Refrigerate the frosting until thick but still spreadable. Fill cookies and enjoy.

Tuesday, December 22, 2009

My punishment for cheating.

Yes, I admit it. I cheated. I bought Pillsbury sugar cookie dough in an attempt to shortcut the sugar cookie experience. I suck, I know. But if it makes you feel any better, I paid a steep price for my cheat.

Beyond the guilt and shame, my punishment is the challenge of trying to deal with these ridiculous, shapeless Christmas cookies. You probably cannot tell from looking, but those are bells, trees, stars (yes, stars!) and a pair of snowmen engaged in what looks to be an inappropriate act of passion.

Usually, almost always, like 98% of the time, I bake from scratch. Especially with my Christmas cookies. In my house growing up, we have a long tradition of decorating dozens upon dozen upon dozens of homemade Christmas cookies. The cookies are buttery and light and melt in your mouth and delicious, and always because they are made from scratch. So, I guess I deserve these horrible shapes for deviating from tradition.

Next time, I will bake from scratch. I promise.

Friday, December 18, 2009

The secret ingredient is lard.


Behold my first Christmas cookie of the season, a heart shaped biscochito. The biscochito is the New Mexican State cookie, and a very special one at that. It is an anise-flavored shortbread that appears in cookie jars almost exclusively at Christmas — and also sometimes at weddings, baptisms and quinceñeras. The cookies are dusted in cinnamon sugar. Cooks often use brandy or wine for flavor. They are light and flaky and crispy, like a good sugar cookie. And they are made with lard.

I had you until I said lard, didn't I?

Don't feel alone in your repulsion to the idea of lard. I was the same way at first, totally grossed out. And to be honest, the idea of lard still kind of freaks me out. I don't exactly know why, because I love bacon. I even save bacon fat in an old jelly jar for sauteing Brussels sprouts and melting into sauteed greens. Bacon fat is delicious. I mean really, really delicious. Do you like bacon? Most of us do. So if you like bacon, and if you eat bacon, and if you are not disturbed by the idea of Brussels sprouts sauteed in pancetta, then why would you be grossed out at lard?

It's just a little bit of pork fat. Or Manteca de Puerco, depending on where you buy it.

However, if the delicious bacon argument has not warmed you up to lard cookies yet, read on. I will try to appeal to your intellect through the power of lard science. I have a theory that the more you know about lard, the less grossed out you will feel. For example, did you know that freshly rendered lard has less saturated fat and less cholesterol than butter? Lard contains just 40 percent saturated fat (compared with nearly 60 percent for butter). So while it is not considered healthy, it is healthier than the butter or hydrogenated shortening alternative.

Keep in mind that this health value is only relevant in fresh lard, the kind that must be refrigerated. Commercial lard (the kind that comes in the blue or green box or tub) is hydrogenated, and therefore has the same faults as shortening. Plus, it lacks flavor. Two good reasons it should be avoided.

Still not convinced? If the similarities to bacon or the healthful composition of lard does not sell you on its superiority as a baking staple, consider your alternative, shortening. Not only is Crisco hydrogenated, which is bad for your heart, it is also of dubious origins. Let me enlighten you to the historical context of the product. Solid vegetable shortening, which became popular around the middle of the 20th century, was discovered when researchers hydrogenated cottonseed oil in the hopes of finding a way to make soap and candles. Of course, soon electricity diminished the need for candles. But these same scientists noticed how much their candle-wannabes resembled lard, and so they opted to market it as a cooking oil. The name they gave it was Crisco — a contraction of "crystallized cottonseed oil."

The idea that hydrogenated shortening was originally designed as a candle should repulse you as much as your original reaction to the thought of lard.

When you use shortening, you are using what was originally developed as a household candle. Ick. Plus shortening is full of trans fats. Vegetable shortenings that are solid at room temperature — or hydrogenated — are chocked full of 'em. There is plenty of evidence that trans fats raise bad cholesterol (LDL) and lower the more protective cholesterol (HDL).

In addition, authoritative figures tout the merits of lard in cooking. Many a fine chef and baker declare lard the superior fat for baking. It makes light, flaky, savory pie crusts. And in a biscochito it makes a crispy, crunchy, not-to-sweet Christmas treat. Really lard is the only way to make these cookies taste as they should.

Of course, acquiring the lard required some less tasty experiences, including a trip into a stinky meat market, a run-in with a cooler full of frozen pig heads, and the discovery that a place with a wall of tripe and beef tongues is not guaranteed to also carry fresh lard. It took us three different stores and the purchase of more than 60 fluid ounces of rendered pork fat to find the Manteca de Puerco I needed for baking. All in all it was a pretty gross adventure, and I was almost turned completely off of the idea of baking with lard. So when my first batch came out of the oven, I hesitantly tasted the first cookie, first with a small nibble, and then with a more confident bite, chew, swallow, and a smile.

Sadly, my husband was less receptive. After his first biscochito, Sam promptly declared his mouth tasted like pork fat and poured himself a glass of Scotch to burn out the flavor. I, on the other hand, was delighted. The cookies tasted just like I remembered them. Only now I have four dozen biscochitos and none to eat them with.

I think his turn off comes down to seeing and smelling the lard pre-batter. One word of advice, if baking with meat market lard, try not to smell it. It smells like, um there is not better way to say this, it smells like rendered pork fat. Which, of course, is what it is supposed to smell like. But still, it smelled a bit ick. And it also looked a bit ick.

In summary, the Christmas consider moving into the realm of authentic baking. Just try not to look at, smell, touch, or think about the Manteca de Puerco (lard) and you will adore your Christmas biscochitos. Oh yes, and keep them away from vegetarians.


New Mexican Biscochitos

6 cups all-purpose flour
1/4 teaspoon salt
3 teaspoons baking powder
2 cups shortening
1 1/2 cups white sugar
2 teaspoons anise seed
2 eggs
1/4 cup brandy
1/4 cup white sugar
1 teaspoon ground cinnamon

1. Preheat the oven to 350 degrees F (175 degrees C)
2. Sift flour with baking powder and salt.
3. Cream shortening with sugar and anise seeds until fluffy. Beat in eggs one at a time.
4. Mix in flour and brandy until well blended.
5. Turn dough out on a floured board and pat or roll to 1/4 or 1/2 inch thickness. Cut into shapes (the fleur-de-lys is traditional). Dust with a mixture of 1/4 cup sugar and 1 tsp cinnamon.
6. Bake for 10 to 12 minutes in the preheated oven, or until golden brown.

Tuesday, December 8, 2009

The great miracle of yeast.


Working with yeast makes me feel like a miracle worker. Seriously, it is as close as I get to achieving what a farmer achieves in a growing season. You start from seed with the dry yeast, plant the crop by incorporating the yeast into a dough, cultivate the yeast with careful tending over a period of time as it rises, deflates, and re-rises , monitor the crop's susceptibility to environmental disaster by keeping it in a warm, moist area, and finally you harvest the final, bountiful crop from a warm oven. Of course, unlike a farmer, my crop offers more immediate gratification. Sure, my Thanksgiving brioche took a good 16 hours from start to finish, but it was significantly faster than the summer growing season.

I used my Kitchenaid stand mixer for this decadent roll, following the instructions of Dorie Greenspan from a Fall Bon Appetit issue. Ms. Greenspan wrote about the dough with such affection, and combined with her no-nonsense, "You can do it" attitude, I could not resist.

Sam and I developed a bit of an ego as we baked. It was as though the rolls rose in proportion to our pride. With every step of home baked bread recipe, we felt increasingly proud of our efforts. And of course, with every step of the creation, the yeasty rolls just rose and rose, as though our own self confidence and ego were propelling the rise rather than the yeast. After all, how often does anyone home bake bread these days? Not often. But we did!

The best bites were straight out of the oven, almost too hot to touch, and steaming. They rolls lost luster with age, so please do not restrain yourself around a fresh baked batch. No matter that we were on our way to Thanksgiving dinner right after they baked, I still wish I had eaten two. By the time they hit the table they could have stood for a bit of butter or jam, and on the second day the rolls were in the dry phase, primed and ready for french toast or bread pudding. I never could bring myself to slather them in butter, even the day-old dry leftovers, given the lavish stick and a half in the recipe. But maybe I should have. After all, a bit of brioche is a shame to waste on anything less than perfection.


Bubble-Top Brioches
from Bon Appétit, October 2009 by Dorie Greenspan

1/4 cup warm water (110°F to 115°F)
1/4 cup warm whole milk (110°F to 115°F)
3 teaspoons active dry yeast (measured from two 1/4-ounce envelopes)
2 3/4 cups all purpose flour
1 1/2 teaspoons salt
3 large eggs, room temperature
3 tablespoons sugar
12 tablespoons (1 1/2 sticks) unsalted butter, room temperature
1 large egg beaten to blend with 1 teaspoon water (for glaze)

Combine 1/4 cup warm water and warm milk in bowl of heavy-duty mixer fitted with paddle attachment. Sprinkle yeast over and stir to moisten evenly. Let stand until yeast dissolves, stirring occasionally, about 8 minutes.

Add flour and salt to yeast mixture. Blend at medium-low speed until shaggy lumps form, scraping down sides of bowl occasionally, 1 to 2 minutes. Add eggs, 1 at a time, beating until blended after each addition. Beat in sugar. Increase mixer speed to medium; beat until dough is smooth, about 3 minutes.

Reduce speed to low. Add butter, 1 tablespoon at a time, beating until blended after each addition, about 4 minutes (dough will be soft and silky). Increase speed to medium-high and beat until dough pulls away from sides of bowl and climbs paddle, 8 to 9 minutes.

Lightly butter large bowl. Scrape dough into bowl. Cover bowl with plastic wrap. Let dough rise in warm draft-free area until almost doubled in volume, about 1 hour 15 minutes to 1 hour 30 minutes.

Gently deflate dough by lifting around edges, then letting dough fall back into bowl, turning bowl and repeating as needed. Cover bowl tightly with plastic wrap and chill, deflating dough in same way every 30 minutes until dough stops rising, about 2 hours. Chill overnight. (At this point, use the dough to make 12 brioches, or 6 brioches and 1 tart, or 2 tarts.)

Butter 12 standard (1/3-cup) muffin cups. Divide dough into 12 equal pieces; cut each piece into thirds. Roll each small piece between palms into ball. Place 3 balls in each prepared cup (dough will fill cup). Place muffin pan in warm draft-free area; lay sheet of waxed paper over. Let dough rise until light and almost doubled (dough will rise 1/2 inch to 1 inch above top rim of muffin cups), 50 to 60 minutes.

Position rack in center of oven and preheat to 400°F. Place muffin pan on rimmed baking sheet. Gently brush egg glaze over risen dough, being careful that glaze does not drip between dough and pan (which can prevent full expansion in oven). Bake brioches until golden brown, covering with foil if browning too quickly, about 20 minutes. Transfer pan to rack. Cool 10 minutes. Remove brioches from pan. Serve warm or at room temperature.

Monday, November 30, 2009

The leftovers are the second best part.

The last piece of leftover pie is eaten, and while we still have some straggling turkey and dressing and mashed sweet potatoes left in Tupperwares in the fridge, at this point I think it is safe to say that the Thanksgiving feast has drawn to a close.

My husband and I spent this Thanksgiving in San Antonio, away from our families. And while the tradition of the whole family gathered around the table was not a reality for us this year, we certainly remembered our loved ones through the tradition of preparing family-specialty dishes. Sharing traditions and passing them through households is perhaps the best part of Thanksgiving. In fact, I dare say the sharing of traditional dishes is even better than the "everything sandwiches" my husband looks forward to creating from Turkey Day leftovers (imagine your traditional Thanksgiving plate, only sandwiched between two pieces of bread).

I have yet to find another family that shares my family's Crab Demose tradition. Before every Thanksgiving feast, we began the meal with a rich, flavorful seafood appetizer served out of hallmark seashell plates. I have no idea where the recipe originated, but I do know it is something my grandmother - Grandmarj - used to prepared for her holiday table. Given the lavish amounts of mayonnaise in the recipe, combined with the rich flavors of mustard and curry, and rounded out with a bright squeeze of lemon, the dish is so flavorful that it is perfectly at home on a Thanksgiving table.

So on Thursday, while the pies baked and the kitchen was full of aromas of nutmeg and sage and browing meats and baking bread, my husband and I sat down to a table for two. We feasted on Crab Demose as a bountiful amuse bouche to the main meal. My grandmother, my own mother, and the entire extended family were with us in spirit. I felt thankful to share the holiday with my family, if not in person via the tradition passed from kitchen to kitchen.

Of course, this does not need to be a Thanksgiving-only dish. You can whip it up for a decadent lunch, an impressive first course at your next dinner party, or perhaps with a nice green salad for your own dinner tonight. Any way you make it, I hope it finds a place in your recipe file reserved for special occasions and special people. Maybe someday it will also become your special tradition.

Crab Demose
Serves 4 -6

This dish is best served in a shallow shell, and yes, I mean a real shell. The best part of this dish is the crunchy crust that forms over the top. To maximize crust and ensure everything heats through as it should, arrange the dish in shallow layers. It also helps to use piping hot wild rice when you assemble the dish, otherwise it will not heat through.

1 cup mayonaise
4 tsp premium mustard, I prefer Dijon
4 tsp yellow curry powder
1/2 tsp salt
2-4 tsp lemon juice to taste
1/2 lbs. lump crab meat
1 cup wild rice, cooked
1/2 Parmesan cheese

Combine first five ingredients to create sauce. If sauce is too think to spread easily, thin with a little bit of milk. In a shallow dish, lay down a bed of wild rice, hollowing out a crater in the center. Layer lump crab meat in rice crater. Top generously with sauce, ensuring all crab is covered. Sprinkle with Parmesan cheese and place under broiler until melted and brown crust forms.

Thursday, November 5, 2009

We interrupt your regularly scheduled program...

This just in, Sincerely Yours, Kate has breaking news. We interrupt your regularly scheduled asymmetrical skirt programming for this brief update on the season's best chili.

I am usually a ground beef and beans kinda girl when it comes to chili, but this is an all brisket style with a secret addition of squash. I was wrongly incredulous when I first saw the recipe in a Bon Appetite last fall. But Sam was smittin' and so the first time we made this recipe was for a chili cook off at his work. We did a bad job reading the instructions and started making the chili at 9:30 p.m. only to realize that there were many steps after two hours of braising, then two more hours of braising, etc. So needless to say we set the alarm and had mini-chili cooking sessions throughout the night. But seriously, this chili is worth it. Sam took a respectable 2nd place, but we both think this pot-o-deliciousness should have won. A department secretary took first place, and Sam swears she bribed the votes with candy. Plus, as any of us who work in large offices know, you ALWAYS want to keep on a secretary's good side, even if it means voting for the wrong chili.

Anyway, unfair second place standing aside, this chili is now a favorite, and a real crowd pleaser. Ever since getting married, I have been trying to establish a new household tradition of the chili cook-off Halloween. It worked the first year, because Halloween was on a weeknight and no one wanted to party. We had a massive chili cook off with a dozen entries. But last year my plan failed. Halloween was on a Friday and everyone wanted to drink beer, not cook chili. This year I reinstated Chili Halloween, but took away the competition component. We had friends over and made a big pot of this and a big pot of veggie chili. The brisket chili was a smash hit!

Oh yeah, and I also baked a really delicious apple cake in three layers that sadly imploded on itself. I guess apples are too heavy to stack so high...? It tasted good, but looked rather sloppy. Which brings me back to the showstopping dish of the night. Aside from being delicious, one benefit of chili is that it is not a greedy dish. It never goes for looks and taste simultaneously like my cake tried for. A good old fashioned chili just skips the vanity and puts all of its effort into the taste. And this Haloween, the chili delivered.

Texas Beef Brisket Chili
A cold-weather favorite, this all-beef, no-bean chili gets added appeal from a seasonal ingredient: butternut squash. For best results, make the chili at least one day ahead so that the flavors have time to meld.

Ingredients:
  • 6 large dried ancho chiles*
  • 6 ounces bacon, diced
  • 1 1/4 pounds onions, chopped (about 4 cups)
  • 1 5-pound flat-cut (also called first-cut) beef brisket, cut into 2 1/2- to 3-inch cubes
  • Coarse kosher salt
  • 6 large garlic cloves, peeled
  • 2 tablespoons chili powder
  • 2 teaspoons cumin seeds
  • 1 teaspoon dried oregano
  • 1 teaspoon ground coriander
  • 1 1/2 teaspoons coarse kosher salt
  • 1 1/2 10-ounce cans fire-roasted diced tomatoes with green chiles (1 3/4 cups)
  • 1 12-ounce bottle Mexican beer
  • 1 7-ounce can diced roasted green chiles
  • 1/2 cup finely chopped fresh cilantro stems
  • 4 cups 1 1/2- to 2-inch chunks seeded peeled butternut squash (from 3 1/2-pound squash)
Instructions:

Place chiles in medium bowl. Pour enough boiling water over to cover. Soak until chiles soften, at least 30 minutes and up to 4 hours.

Preheat oven to 350°F. Sauté bacon in heavy large oven-proof pot over medium-high heat until beginning to brown. Add onions. Reduce heat to medium; cover and cook until tender, about 5 minutes. Sprinkle beef all over with coarse salt and pepper. Add to pot; stir to coat. Set aside.

Drain chiles, reserving soaking liquid. Place chiles in blender. Add 1 cup soaking liquid, garlic, chili powder, cumin seeds, oregano, coriander, and 1 1/2 teaspoons coarse salt; blend to puree, adding more soaking liquid by 1/4 cupfuls if very thick. Pour puree over brisket in pot. Add tomatoes with juices, beer, green chiles, and cilantro stems. Stir to coat evenly.

Bring chili to simmer. Cover and place in oven. Cook 2 hours. Uncover and cook until beef is almost tender, about 1 hour. Add squash; stir to coat. Roast uncovered until beef and squash are tender, adding more soaking liquid if needed to keep meat covered, about 45 minutes longer. Season chili to taste with salt and pepper. Tilt pot and spoon off any fat from surface of sauce. DO AHEAD: Can be made 2 days ahead. Cool 1 hour. Chill uncovered until cold, then cover and keep chilled.

Sunday, November 1, 2009

Asymmetrical Folds Skirt - The Upholstery Version.

If you like asymmetry, and if you like folds, and if you also like skirts, then today is your lucky day. Why, you may ask? Because today I debut for you none other than my fourth version of the Asymmetrical Folds Skirt. The skirt based on a pattern from Stitch Magazine. My fascination with the skirt started with the green velvet version, continued with a set of four identical red gingham versions for a family reunion tribute, and then moved on to a fall foliage interpretation. Today, you find yourself viewing the latest incarnation of the pattern, this time in a handsome upholstery.

This version is made entirely of home decor fabrics. As such, it is both heavy-weight and full of body. My husband is worried that I look like a sofa, but I think I look stunning and original. We may both be correct in our interpretations. In fact, I will go so far as to say that I think I look like a plus-size Anthropologie model (is that overly vain of me?). If I was going for that vintage carpet bagger look (and I was), I think I nailed it.

A few important things to note about this version of the skirt. First, I lined the whole darn thing in a pale green home decor-weight raw silk. That may prove to be a mistake for three reasons, 1) it just might be too warm for South Texas, 2) silk tends to smell when introduced to sweat, and well, what is a lining for if not to be the first line of defense against sweat (also, see reason #1), and 3) even if it is not too warm and does not smell, raw silk is darn expensive, especially for a lining that is note seen. But then again, to all of those reasons I say, "whatever!" It is the perfect shade of pale green.

Another point to note is that the heavy-weight fabric was just too thick for button holes once doubled up in folds along my hip. I even took it to two upholsterers in my neighborhood to see if they could help. They could not. So instead of buttons I basted the folds in place and stitched hook and eye closures where the buttons might have been. The folds are a bit bulky, they certainly do not drape as gently as the velvet or cotton versions, but the body of the fabrics helps the hem of the skirt to flair and shape at my knees, which is a look I really like. Overall I am very pleased and look forward to the next 50 degree Friday evening. I think I have a good outfit for a date with my husband.

If you think that four Asymmetrical Folds skirts are too many, then you can just go ahead and stop reading this blog. But if perchance you, like me, believe that there is no such thing as too much of a good thing, well then you are going to want to stay in touch. Check back in a few days, I think you will be pleasantly surprised by what lays in store (well, maybe not surprised, as I am being a bit obvious over here, but at least you will be delighted).


Thursday, October 29, 2009

Asymmetrical Folds Skirt - The Fall Version.

Well, it's almost Halloween, which means here in South Texas the weather is finally dipping below 80 degrees and the sun fades earlier in the evening. The trees and grass still grow green, and my air conditioner hums along at least 75% of the time, but the grocery store is stocking fresh pressed cider and I bought candy corn for a ceramic pumpkin dish in my kitchen, so in other words, it's fall.

And what better way to celebrate than with a new fall skirt? This is none other than my favorite Asymmetrical Folds Skirt pattern, but this time sewn up in an Autumn cotton blend. I reviewed the skirt this winter in great detail already, so below is a modified pattern review for this version. If you like this, and if you like the original in green velvet, stay tuned. You just might be in store for a treat (no tricks) next week.

Pattern Description:
The pattern comes from the inaugural issue of Stitch magazine, a publication from Quilting Arts. "Add a modern twist to the classic wrap skirt by working all the angles. Asymmetrical folds that button down the side, the shaped hem, and contrast lining guarantee you'll be a standout in any crowd." The skirt is a take on the basic wrap, but with more decorative closure that includes a four-buttons detail closure along the hip. Each buttonhole is made near the edge of the skirt, through folds of doubled over fabric. Part of the lining shows with each fold, and the hem is raised asymmetrically into a gentle arc as a result of the doubling-up of layers on the edge.

Pattern Sizing:
The skirt comes in five sizes XS (26 3/4 inch waist) to XL (38 1/2 inch waist). I sewed the XL with plenty of room. Previously I attempted to increase the size, as XL is often too small for me, but it turns out the Stitch version of XL is plenty big. It would be a simple pattern to tissue fit, so consider taking your measurements and comparing to the actual pattern pieces before choosing your size.

Fabric Used:
I picked up the beautiful stretch-cotton, fall fabric at Elfrieda's Fine Fabrics in Boulder, Colorado on a trip home earlier this spring. I bought five yards thinking it might become a dress, but I never found the perfect frock pattern (or the nerve for such a vibrantly patterned dress). So, I thought, why not use some of the yardage for a work appropriate skirt? The lining is synthetic "linen-like" fabric in brown that I choose for color, easy drape, and low price.

Pattern Alterations or any design changes you made:
An important heads up – the pattern pieces for the skirt facing and interfacing are shorter than the actual skirt, but they should be the same. Make sure you measure and make adjustments before cutting out the facing pieces. A formal correction is available on the Stitch website here.

With that said, I lined the entire skirt rather than only lining the facing area per the instructions. It is just as easy to sew a second skirt for the lining and attach them along the side and waist seams. The lining gives the skirt a bit more body, as well as a bit more modesty and substance. On my first version of the skirt, I stitched the entire lining to the outside of the skirt inside out, and turned them to secure the lining on all four sides of the skirt (waist, sides, and hemline). On this version I only stitched the waist and sides together, and instead hemmed the skirt and lining separately. They remain unattached. The lining hem is about 3/4 inch shorter than the skirt, so it never pokes through. This is an infinitely better way to line the entire skirt than my first version.

What did you particularly like or dislike about the pattern?
I have no dislikes. I just love the drape and style of the skirt. The pretty Grecian-style drapes along the mid section camouflage a tummy, and the asymmetry creates a nice visual line down to the calf. The cut is flattering for all shapes and sizes. I like that the pattern was a piece of cake to cut and sew, with only three major elements plus facings. Also, after cutting out the fabric, the skirt only takes about an hour and a half to sew, including hemming and buttonholes. It offers instant gratification.

Would you sew it again? Would you recommend it to others?
Stay tuned next week to find out the answer to this little question.

Conclusion:

This is a fun and simple skirt with more personality than your average wrap. I think it works for work, dress up, and play depending on fabric. Best yet, it is easy to fit and makes a great project for beginners.

Sunday, October 25, 2009

Kate's custom fitting shell.

A week ago I had a special appointment with a Palmer/Pletsch fit instructor. Patti Palmer and Martha Pletsch are authors of my favorite fit book, Fit for Real People. They are also the founders and instructors at the Palmer/Pletsch International School of Sewing in Portland, OR. If I ever win the lottery or become independently wealthy, I plan to visit them for fit workshops and help. Until then, I am finding assistance with wonderful instructors locally, like Marilyn, who helped me created a custom fitting shell.

Palmer and Pletsch pioneered a particular style of tissue fitting that helps identify and execute pattern alterations on the pattern itself, rather than through tedious muslin fittings. Since tissue fitting yourself is very challenging (how do you see, let alone fit your back by yourself), my morning with Marilyn was invaluable. Marilyn helped me discover all of the quirks of my own figure, and translated these into pattern alterations to help garments fit me as they were designed.

I went into the process thinking of these physical quirks as flaws, although the more I think about it, the less I like to think of my body shape as flawed. Certainly there are areas of my body that are less than they could be (carrying extra weight, for example, or upper arms that are less toned due to a lack of exercise). These "quirks" might fairly be considered flaws. But there are also parts of my shape that are simply intrinsic to my genetic code. My broad shoulders and narrow hips, for example, can never be undone by any amount of exercise. My height, my bone structure, the length of my torso are all examples of "quirks" that are not flaws. True, they differ from the standard shape used to draft commercial patterns, but just because they are different does not mean I need to think of them as flaws or deformities. So instead I will think of these shape alteration specific to my figure as my quirks, my idiosyncrasies, or to make it fun, my Kate Traits.

Kate Traits: The Back

We started with the back, which is ALWAYS the proper place to start. An ill fitting back will result in garment discrepancies in the front, so it is important to always fit the back bodice first. Marilyn put me into several sizes of pre-sewn fitting shells, looking careful at the back to determine the correct pattern size based on my shoulder breadth. First things first, I was able to GO DOWN A SIZE in patterns. I always thought I needed a size 24 based on my high bust of 46 inches. However it turns out my best size is actually a bit smaller, and this smaller size fits more appropriately to my shoulder width.

As I have always surmised, my front side is significantly larger than my backside. However, trying to buy to fit my front always results in ill-fitting garments with shoulder issues (see Everyone's Favorite Claire McCardell as an example). Rather than buying big and scaling back, Marilyn succeeded in showing me how to buy for my smallest part and increase size with alterations for specific quirks and idiosyncrasies, thereby ensuring a stronger, closer fit overall. Brilliant.

Looking at my back in the tissue fit, Marilyn immediately wrinkled her brow at the wrinkling and puckering in the lower armhole area, which she acknowledged is due to my high round back. Apparently, I have a very prominent protrusion in my spine just above my shoulders where my back becomes my neck. This rounded area pulls the fabric and affects fit in the arm area. It is so protruding, in fact, that it requires a full 3/4 inch high round back adjustment. According to Marilyn, this is a fairly significant amount to add to the back, so it should be added in two areas. I add a 1/2 inch to the highest high back, and 1/4 inch to the low high back. Conveniently, these areas for alteration are noted on the Palmer Pletsch fitting shell, which made the alteration easy (and you can see in the above photo), however for other patterns I need simply gauge the two areas for alteration based on arm hole to make the alteration.

My back torso is also a bit longer than average, so I added 5/8 inch in back length. This was done as a horizontal adjustment just above the waistline. On other patterns it should be made at the lengthen/shorten line if noted, and if not, always made above the waistline.

Finally, because I have a thick middle, I need to add about an inch extra at the side seam at the wast, and taper the stitching line to its mark. I also need to eliminate back darts. Marilyn suggested I can create an "essence of dart" by stitching a tiny, essentially non functional dart if they are part of the design element of a pattern, but for me there is no real need to taper material. I need all I can get to cover my midsection without pulling.

Kate Traits: The Front

When the back fit, we moved to the front. The first alteration Marilyn noticed was a forward shoulder. Apparently, along with my high round back I also have shoulders that slope slightly more forward than average, so I must add 3/8 inch to the shoulder seam at the armhole on the back bodice, and true the seam by tapering my new stitch line to the existing stick line. This means I must also DECREASE the shoulder seam on the front of the bodice by 3/8. The idea is to never, ever, ever alter the circumference of the armhole when making alterations. So if you add to one area along the armscye, you must take it away from another area.

Next she lengthened the front bodice 5/8 inch on the shorten/lengthen line to match the alteration we made to the back. The general idea in all of these alterations is to make sure that the seam lines always remain the same. The armscye should not change on the bodice, lest you need to make changes on the sleeve too. Therefore if you add 5/8 to the entire back of a garment in a way that changes the side seam, you must make the same alteration to the front to lengthen the overall side seam. Otherwise you end up with mismatched side seams.

With the shoulders fit, we jumped right into the full bust alteration, for obvious reasons. The pattern only pulled partway across my bust without coming close to my center front, and because I needed to add a gigantic 2 1/2 inches in my full bust adjustment, Marilyn taught me the new and improved Y-bust FBA. It magnificently adds the needed width and length in the full bust while keeping better proportions than a standard full bust adjustment. The Y-bust involves spreading the adjustment over two areas, rather than one. It is so helpful I plan to post a second post focused entirely on this new technique. It's that helpful.

The Y-bust gracefully assisted the tissue bodice in covering my ample bosom, and the shoulders maintained a very nice, flush proximity to my chest. No armpit, shoulder poufing as I have experienced with other FBA. However, due to my ample tummy, the pattern was still not long enough to pull down to my waistline. Thus Marilyn added 2 5/8 inches in length at the center front. With a lesser adjustment (less than an inch), you would simply true the seam at this point by drawing a new stitching line lined up along the new center length to the side seam (in order to avoid altering the side seam length, as mentioned earlier). However my addition is so significant, she encouraged me to carry the 2 5/8 straight through the bust point, before truing the seam. It makes sense to me, I have a lot of roundness to cover in my center belly.

Kate Traits: The Sleeve

As expected, my overall larger body size also means larger arms, although my right arm turns out to be bigger than my left. My left gun clocks in at 14 1/2 inches around, while my right arm measures a full 16 inches. Marlyn assures me that this is not a visibly noticeable difference, and I should always alter for my larger side on both sides.

Again, the idea when making sleeve alterations is to NEVER change the circumference of the armhole, so before making any sleeve adjustments we traced the original armhole onto tissue and marked where to reattach later. After all adjustments, we placed to original curve back on the arm to maintain proportion.

Overall we added 2 inches to the upper arm. We also shortened the sleeve by 1 inch total, taking 1/2 from above the elbow, and 1/2 from below the elbow to maintain proportion.

Kate Traits: The Skirt

The good news is that like the bodice, the back skirt fit well in a size 22. Again, I eliminate the darts entirely to accommodate my thick waist. I have an incredibly flat derriere (that is the honest to god alteration terminology in the book!), so there is no need for me to dart the back to accommodate any curves. Marilyn again suggested that I can always create an "essence of dart" for design aesthetic without actually changing the back width of the skirt.

The front of the skirt, wow, it was shockingly too small. In the end we added about 5 inches to the side seam and eliminate front darts entirely. These changes were coupled with changing the top stitching line on the skirt. In order to keep the hem straight, the adjustment needs to be made at the waist. The center front of the skirt should always match the center front of the person, so in adding waist width I also had to pull up the waist of the skirt along the center front of the waist, to avoid a droopy middle. It is, quite frankly, hard to explain, but works wonderfully to keep everything proportional.

Overall it was a great experience. I am pleased to use my new found size 22 as my starting point, and especially pleased about this as it puts me back into the size range of most traditional patterns which often go up to 22 but not beyond. Yay!

My next order of business is learning to use the fitting shell as a guide for altering other patterns. I may even retrace the lines and laminate the fitting shell for a permanent reminder of my body map. And with that I am filled with a renewed vigor and enthusiasm for sewing. Let the custom alterations commence!