Sunday, January 30, 2011

Pattern Review: Colette Madeleine Mini Bloomers

These pretty little bloomer shorts are designed to rest underneath a new Burda Allie robe. When Claire visited in December, I promised we would sew. First I promised pajama pants, but then I remember how most PJ pants are frumpy and ill-fitting and just sooooooo unsexy. What's a girl to do?

Then I remember, you know what is super sexy? Colette Pattern's Madeleine Mini Bloomers. I mean, just look at them. They are short. Low cut. Cute and approachable, but with some sex appeal. And best yet, the pattern is free and easy to sew. So we changed plans. PJ pants gone, mini bloomers under the presser foot.

The pattern review is below. Find you copy of this little beaut online at Colette Patterns. With Valentine's day right around the corner, it's the perfect time of year for these.

Pattern Description:
From the website: These are no prim and proper Victorian bloomers. They sit low on the waist, and are scandalously brief. The back view is particularly flattering. The waistband is sewn with two rows of elastic, and the legs are cinched with a length of ribbon. With just two pattern pieces, a beginner who is comfortable with elastic and buttonholes can make these.

Pattern Sizing:
Multi-sized for XS to XL, which encompasses the usual sizes 0-18 (equivalent to ready to wear) in Colette Patterns’ range, roughly hip size 35 inches to 48 inches.

Fabric Used:
We used Anna Maria Horner's Innocent Crush Viole, including the pattern "First Impressions - Blush". The cotton was GORGEOUS, very soft with a lovely drape, and easy to sew. We purchased all fabric from Fancy Tiger in Denver, Colorado and they were incredibly helpful.

Pattern Alterations or any design changes you made:
We sewed Claire's bloomers in a size medium, no pattern alterations made.

However, for mine (featured) I made a few adjustments based on Patty the Snug Bug's review and advice to add some rise length and width. I added two inches of length to the front and back pieces to bring the rise up and waistband closer to my navel. This was a good adjustment.

Also, fearing the size XL would be a bit too tight over my midsection, I graded the front pieces wider by two inches by slashing and spreading 1" extra to each side of the front. This turned out to be a bad choice and a silly adjustment on my part. First, the finished shorts would have been plenty big without the extra two inches, completely unadjusted. But even if I had wanted to add some width, I only really need extra room over the tummy, not over my narrower hips. Colette designs for a "curvy" gal, and her patterns seem to all curve in at the waist. Instead of a straight 1 inch grade all the way down, I should have just straighten out this waist curve and added the inch there alone, truing to the existing hip line. Make sense?

We did not succeed in adding the pleats to the lower leg opening as the pattern suggests, as I could not quite figure out how to work this around the button holes I had already added. They look really adorable in theory, but I don't miss them either.

What did you particularly like or dislike about the pattern?
Like: This is a quick sew.
Like: It's free!
Like: The instructions are clear with great illustrations.
Like: The generous fit means this can be versatile for different sized and shaped people.
Like: The double elastic casing that forms the waistband is GENIUS. It looks super cute and girlie, it was a cinch to sew, and it helps hold the little shorts up like a champ.

Dislike: The rise in the design is really, really low. I mean, loooooow, like, "how low can ya go?" low. Take a look at the the sample on the model here, and you might find yourself thinking "wow, those are low, that model must have a really really long waist"... well, think again. Sure, the model is long and lean, but more than that, the bloomers look that low because they ARE that low. :) They were nearly too low for my 24 year old svelte and flat tummied sister Claire. She admitted she would like at least two more inches in the rise to be considered decent (and comfortable). I added two inches to mine, but the finished product is still really low. I think I really needed four inches extra length total. Even with four inches added to the rise, they will still rest comfortable under my belly button in a very respectable "sexy" position. Consider yourself warned, the rise needs some adjustments for most.

Dislike: The buttonhole placement on the pattern and the point at which the instructions indicate making the buttonhole.... I might suggested waiting a bit and ironing up the hem to gauge placement of buttonholes before adding them to the pattern. This would ensure they fall on the right place for your thighs.

Would you sew it again? Would you recommend it to others?
I highly recommend this pattern. There's nothing to loose, its a great beginner project, and it is a nice way to utilize some shorter lengths of fabric from your stash.

I do have a suggestion on creating the leg casings for the ribbon. I am not entirely sure about the instructions for construction of the leg opening. My fabric did not fold and stitch exactly as she suggested it would. I strongly recommend playing with the leg hems and casing area a bit before sewing or adding button holes. Iron out your seems BEFORE you make the holes (the old measure twice, cut once advice).

I also suggest incorporating some elastic into the leg casing. I want my bloomers to look very gathered at the thigh for the flouncy effect. However, I find my thighs spread a bit wider when I sit or lay in certain positions verse when I stand. So, if I tie the ribbon for standing, they feel to tight when I sit or lay. But if I tie them for comfort sitting and laying, they look too loose when I stand. A happy solution would be to attach elastic to the ribbons and run this through the casing. Then I would have the ease of stretch to accommodate movement, but the look of ribbon poking out the casing as designed.

Conclusion:
Cute cute cute! There is no reason not to give these a go.

Tuesday, January 25, 2011

Crepe Sewalong: Muslin III

Well, I thought I was finished with the Crepe muslins, but I am not. Something weird is happening in the armpit and shoulder area on this Crepe Muslin III. The dress is binding in my armpit. It is tight when I move my arms forward or up. Also, there are drag lines. And in the shoulder, well the shoulder seam seems to be standing up off of my shoulder a bit. Behold the fit in Muslin III:

See all those drag lines pulling right to the back armpit? Yikes! Other than that, the back looks pretty good, especially with the new darts. I am a bit bummed that the inside wrap folded in on itself for these photos, but
whatever.

You can see some fabric gathering above my back armpit there. It binds a lot, and thanks to the pulling sensation I can tell it is not big enough. Also, there are some slight drag lines across my back, perhaps indicating I have pulled the wrap a bit too tight? But I don't think they are major. Hey, I can't expect this to fit without any wrinkles like a knit, right?! Is that a reasonable attitude?

Here's the front, with two
different dart lengths. The longer dart definitely goes all the way to my apex (as opposed to ending short of the breast), but it also seems to have less wrinkling on that side. Perhaps on muslin IV (sigh, I have to make a fourth...) I will sew with short, rounded darts and press really well. Instinct tells me shorter is better.

From these side views you can really see how the armpit is too small. The think part of this is because I shortened the bodice from by an inch with a straight across upper chest tuck, which pulled the armpit of the armhole up. But the binding seems most intense at the back of the arm. I am going to try deepening this lower armpit on front and back to correct this (without unleashing the underarm pouch!).

Monday, January 24, 2011

Crepe Sewalong: Muslin II.5

* Look, new back darts help the fit!

I work at a University, and this fine University has a "Women's Club." It's a rather old-fashioned - and rather AWESOME - organization within the University where female employees, wives of Trinity staff, retired employees, and wives of retired staff get together for social time. I joined the Stitchers Group, a collection of women who meet in the University's costume studio for sewing, knitting, crocheting, and mending once a week.

The costume studio is lovely for two reasons: 1) It is a big space with skylights for ample natural light, plus the amenities of a comfy home, like a washing machine and dryer, dishwasher, sink and fridge, teapot and radio playing happy tunes, and better yet 2) it has every single sewing took imaginable, at my fingertips. And perhaps the coolest thing about the sewing studio is the woman who runs it, Jodi, because she knows so much about sewing and is so helpful to share her knowledge.

She helped me tweak the fit of my Muslin II in late December, making it my new Muslin II.5. The fit is so improved it only needs a few tweaks for perfection. What you see is the beta version of the final Crepe dress. It's almost there, but may have a few bugs to work out yet.

Alterations yet to be made:

Back:
Add back the 1 inch swayback tuck. It was unneeded.
Maybe even add an extra 1/2 inch in length to the back and front
Add back darts in realigned position
Decrease side back by 1 inch (to accommodate addition to front waist, see below)

Front:
Lower bust dart by 3/4" more
Shorten bust dart to align 1" from apex
Curve waist darts
Perhaps shorten waist darts
Add 1 inch width to side front (it's torching a bit forward)
*consider lowering the neckline a bit, maybe...

What do you think, any other changes needed?

Wednesday, January 19, 2011

Pattern Review: Burda Style's Allie Robe

My sister Claire is a budding seamstress, so when she planned a Christmas visit, I promised her some sewing. I originally lured her in with a promise to make pajama pants (sadly, the first pair I made for her never worked out), but as I started to plan for the project, I thought "who wants to wear boring old pajama pants anyways?" Instead, I opted for more sophisticated, whimsical lounge wear. We sewed Burda Style's Allie Robe and matching Colette Pattern's Bloomers.

I have two machines, and originally we were going to sew our respective lounge wear simultaneously, me working on my bloomers and robe, and her working on hers. But time got away from us (actually, we spent too many late nights watching Mad Men Season 1 and then sleeping in late in the mornings), so to hustle our efforts I helped with her projects. Two hands on one robe is better than one, I always say!

Pattern Description:
The Allie Robe is a kimono sleeved dressing gown or robe with a loose fit and dramatic kimono sleeves. The pattern is designed to feature big blocks of color or pattern, as the sleeves, back, sides, and front center pieces are separate.

Pattern Sizing:
The pattern features European sizing, sizes 34-48. This essentially translates to a US size of 2 through 14 (or a 24 1/2 waist to a 32 1/2 waist). For Claire we sewed a size 42, roughly a US 10. Because this is a pattern with lots of ease, the sizing is more flexible.

Fabric Used:
The fabric chart recommends using 3 1/2 meters of fabric, but this is for a cutting layout using all one fabric. In my opinion, all one fabric defeats the design elements of the pattern (and certainly refutes the suggestions and sample garment published by Burda Style). To accommodate three different types of fabric, I had to use 6 yards of 54-60" material (1.5 yards for the Sleeves/Belt, 1.5 yards for Center Front/Back Center, and 3 yards for the Side Front/Side back).

We used Anna Maria Horner's Innocent Crush Viole, including the pattern "First Impressions - Blush" and Anna Maria Horner's Little Folks Viole in "Square Dance - Dusk" and "Pastry Line - Marine". The cottons were GORGEOUS, very soft with a lovely drape, and easy to sew. We purchased all fabric from Fancy Tiger in Denver, Colorado and they were incredibly helpful.

Pattern Alterations or any design changes you made:
I substituted handmade bias binding for the facings, as facings seem messy and floppy in a lounge robe (in my opinion). I created bias binding from left over pieces of the fabric and used it to trim the robe opening and the hem. Because of this I eliminate any stabilizer or interfacing, except in the collar and in the sash. I also added an inside tie at the waist to help hold the robe closed when lounging. Other than that, I sewed the robe as instructed and designed.

What did you particularly like or dislike about the pattern?

Like: The design is lovely. The blocking in the pattern design makes this an interesting robe. I love the ample and dramatic fit of the kimono sleeves.

Like: This is a quick sew.

Like: The generous fit means this can be versatile for different sized and shaped people.

Dislike: I dislike tracing patterns or taping hundreds of pieces of paper together, so I took the PDF to FedEx Kinkos and they printed the pattern on their large scale printer for $15. Of course, at this price the pattern becomes as expensive as a commercial pattern, but it saves so much time and energy that it is worth it.

Dislike: The facing design seemed odd to me. I almost always find that facings flap open on wraps and seem to poke out of the inside of a garment. This designed called for facing the front and neck. It was an easy fix to swap bias binding for facings, so that's what I did.

Dislike: The instructions are sparse and do not clarify much with illustration or descriptions. Because of this, the robe is best sewn by someone with basic sewing experience or a good mentor. Luckily, there is not much technique in the construction, but certain parts of the sewing - like creating the collar or attaching the belt loops - was completely vague. I recommend keeping the instructions up online while you sew. The PDF that comes with the online pattern purchase is too small and awkward to be much help, but the online instructions include larger and more complete images.

Would you sew it again? Would you recommend it to others?
I am in the process of sewing it again, for myself. As the sizing does not go quite big enough for my measurements I am going to grade the pattern up by adding a few inches to the side seams, and do a Full Bust Adjustment to add some inches across the chest.

I recommend this for beginners with some experience, or beginners sewing with someone with some experience.

Conclusion:
This is my first Burda Style pattern and I enjoyed sewing something with a little more pizazz than the big four pattern designs. I do not enjoy the printing, taping, and tracing required of Burda, but it is a necessary evil for this affordable and fashionable pattern line. The good news is that I have the fabric and the pattern ready to go to create my own version in a slightly larger size, so it will be interesting to repeat the project and see if I can't iron out any kinks.

* This is me modeling her robe before mailing it home to her in Colorado. I am significantly larger than she is, so the size 42 was not quite big enough to comfortably wrap. However, I plan to make this in the size 46, and add a few inches to the side seams and perhaps a small full bust adjustment. I think it does have very flexible sizing and I was surprised that I could fit into her smaller size at all.

Tuesday, January 11, 2011

Feeding a small army of beer drinkers.

Happy New Year! We rang in 2011 in the good company of 25 friends, mostly old friends from college, their significant others (now newer friends), and some brand new friends made during the weekend. It's all part of a tradition started years ago, post-graduation, to stage a friend reunion annually around the New Year's holiday. After college, friends spread out, so once a year we try to come together over New Years. In year's past we have collected in Chicago, in Austin, in Denver, and this year the group gathered in the Hill Country outside San Antonio.

It's amazing - absolutely astounding - how wonderful it feels to get together with long-time friends and feel like no time has passed. Conversation flows fluid and easy, dormant "inside" jokes are resurrected, and the weight of the adult world fades just a bit with the revitalized memory of those good old days. I saw friends that I haven't talked to in a year or more, and we could jump right into meaningful conversation, personal stories and thoughts, and the intimate little details of our current lives as though we had been a part of each daily routine during all the passed time. It makes for a really wonderful New Year's , at once very nostalgic and emotional, and simultaneously raucous and carefree.

I volunteered to handle the food. Folks paid me, and I in turn planned, shopped for, and prepared all meals and snacks. When I signed up for the gig, I thought "how hard could it be." As the date arrived and eater started praising me on my forthcoming bravery, I felt nervous. What had I gotten myself into? But the weekend arrived and with my talented husbands untiring support we prepared really nice meals for our small army of beer drinking buddies.

And better yet, we got through the weekend with only one out-of-control grease fire, which quite frankly is sort of an accomplishment given the amount of beer that was consumed and the overall revelrous nature of the group. I blame the fire on crazy old Paula Dean, who packs her recipe with about as much fat as will fit in a pan. For breakfast, I made a triple batch of her French Toast Casserole with Praline Topping, which is a really delicious meal for a crowd. And the triple batch calls for not two, not four, but SIX sticks of butter. It also calls for not two, not four, but SIX cups of half and half.

Well, I overfilled the pans, and as they baked, the butter liquefied, melding with the half and half, and then promptly boiled over onto the bottom of the oven. To alleviate the problem, we put some tinfoil down in the oven. Only we made a mistake, put the tinfoil on the heating element, and then allowed butter and half and half to pool in the foil. Folks, let's just say this combination starts a grease fire of paramount proportions. PARAMOUNT. Let me also tell you that cheap Hill Country rental properties apparently do not come equipped with smoke detectors OR fire extinguishers.

Good friends John and Ted acted as brave firemen, saving our breakfast from the depths of the smokey flames. Lucky, it was fully baked. We retired as a group outside into the sunshine and the chill to eat and allow the house to clear out from the black clouds of smoke, the product of flaming butter and Paula Dean's fatty ambitions. Breakfast was delicious, and 2011 started with a jolt of adrenaline, a sweet smothering of maple syrup, and the praise and admiration of well-fed good friends. All in all, a happy start.

* This is what a fridge looks like when filled with 40 hours of food to serve 25 friends.

Baked French Toast Casserole with Maple Syrup
Modified from a recipe courtesy Paula Dean.

This is no slouch of an indulgent recipe. Paula Dean's recipe calls for half and half and whole milk, plus nearly a carton of eggs and an excess of butter. Don't get me wrong, it's delicious, but we found we could swap out some of the fattening elements for less fattening alternatives with favorable results. Additionally, she called for the bread to be layered in full slices more like traditional french toast, and we found big cubes 1 1/2" square worked just as well and seemed to fit more substance into the pan. Finally, we nearly quadrupled the amount of spices she suggests in both the casserole and the topping. All of our changes are noted in the below recipe.

Ingredients:
1 loaf French bread (13 to 16 ounces)
8 large eggs
1 cups half-and-half
1 cup whole milk
1 cup skim milk
2 tablespoons granulated sugar
1 teaspoon vanilla extract
1 teaspoon ground cinnamon
1/2 teaspoon ground nutmeg
heavy Dash salt
Praline Topping, recipe follows
Maple syrup

Directions:
Slice French bread into large (approx. 1 1/2) cubes (Use any extra bread for garlic toast or bread crumbs). Arrange bread cubes snugly but not packed in a generously buttered 9 by 13-inch flat baking dish, leaving some room between pieces for liquid. In a large bowl, combine the eggs, half-and-half, milk, sugar, vanilla, cinnamon, nutmeg and salt and beat with a rotary beater or whisk until blended but not too bubbly. Pour mixture over the bread slices, making sure all are covered evenly with the milk-egg mixture. Cover with foil and refrigerate overnight.

The next day, preheat oven to 350 degrees F.

Spread Praline Topping evenly over the bread and bake for 40 minutes, until puffed and lightly golden. Serve with maple syrup.

Praline Topping:
1/2 pound (2 sticks) butter
1 cup packed light brown sugar
1 cup chopped pecans
2 tablespoons light corn syrup
2 teaspoon ground cinnamon
1 teaspoon ground nutmeg

Combine all ingredients in a medium bowl and blend well. Makes enough for Baked French Toast Casserole.

Cheers! Happy New Years!

Sam, Faith, Anne, and Lucy on a boat.

Only the finest Busch when we play drinking trivia games.

Jules and sparkler.

Co-organizers Kipp and Lucy.

From top to bottom: Leila's Butt, Ted, Lucy, and Kate

Frank and Katie sleep.

Bags, the best lawn game on classy AstroTurf or otherwise.

Tuesday, December 28, 2010

Kate and Sam's gifts, personalized cookbooks.

Inscribed: "Kate and Sam, Don't let an old oven hold you back! - C. Kimball"

Inscribed: "To Kate and Sam - "Sincerely Yours"! - Howard McGee"

We matched, and I love birds.

Colorado small batch whiskey, for a manly man.

Merry Christmas!

Saturday, December 25, 2010

Merry Christmas!

Merry Christmas to all, and to all a good night!


Merry Christmas to all, and to all a good night!

Friday, December 24, 2010

Sunday, December 19, 2010

Crepe Sewalong: Muslin II

Behold, Muslin II. I'm making progress. This should look familiar, but better. I have made many adjustments, and the bodice fits better then it started. Alas, I am not there yet. Read on for details about what I have done and what I have yet to do.

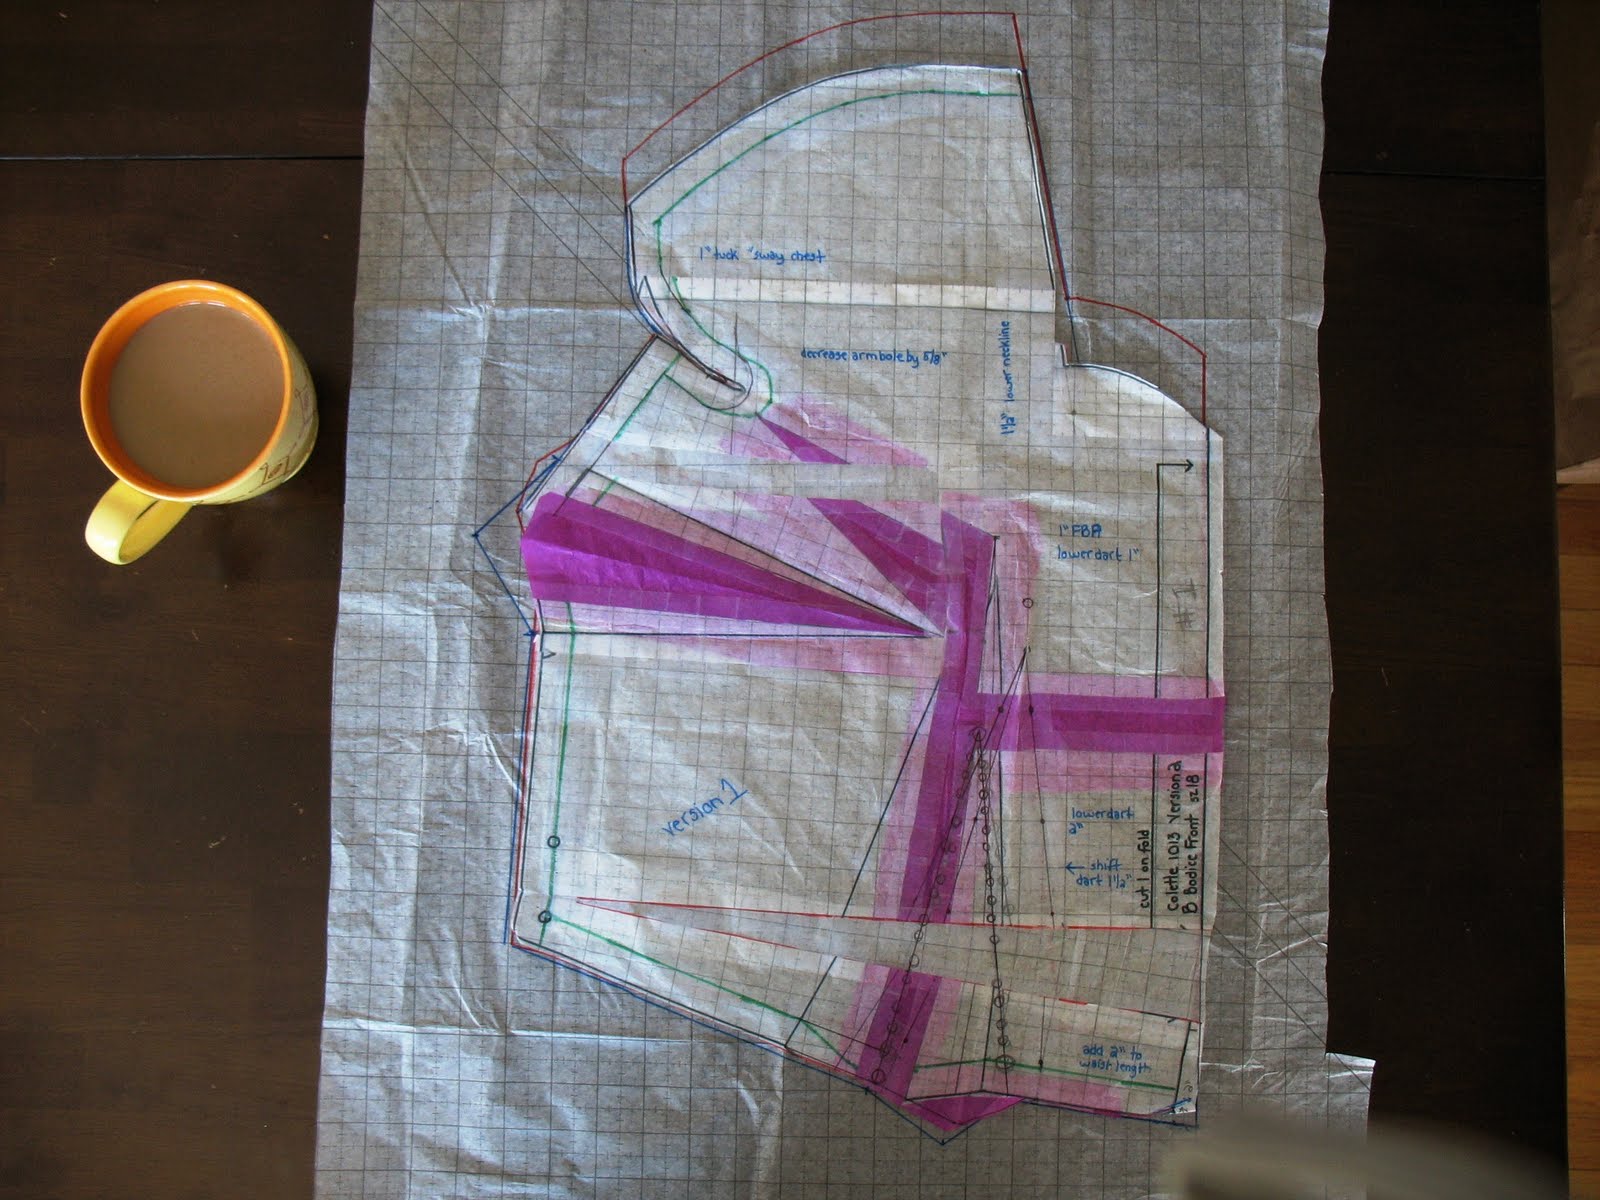
Bodice Front, altered original
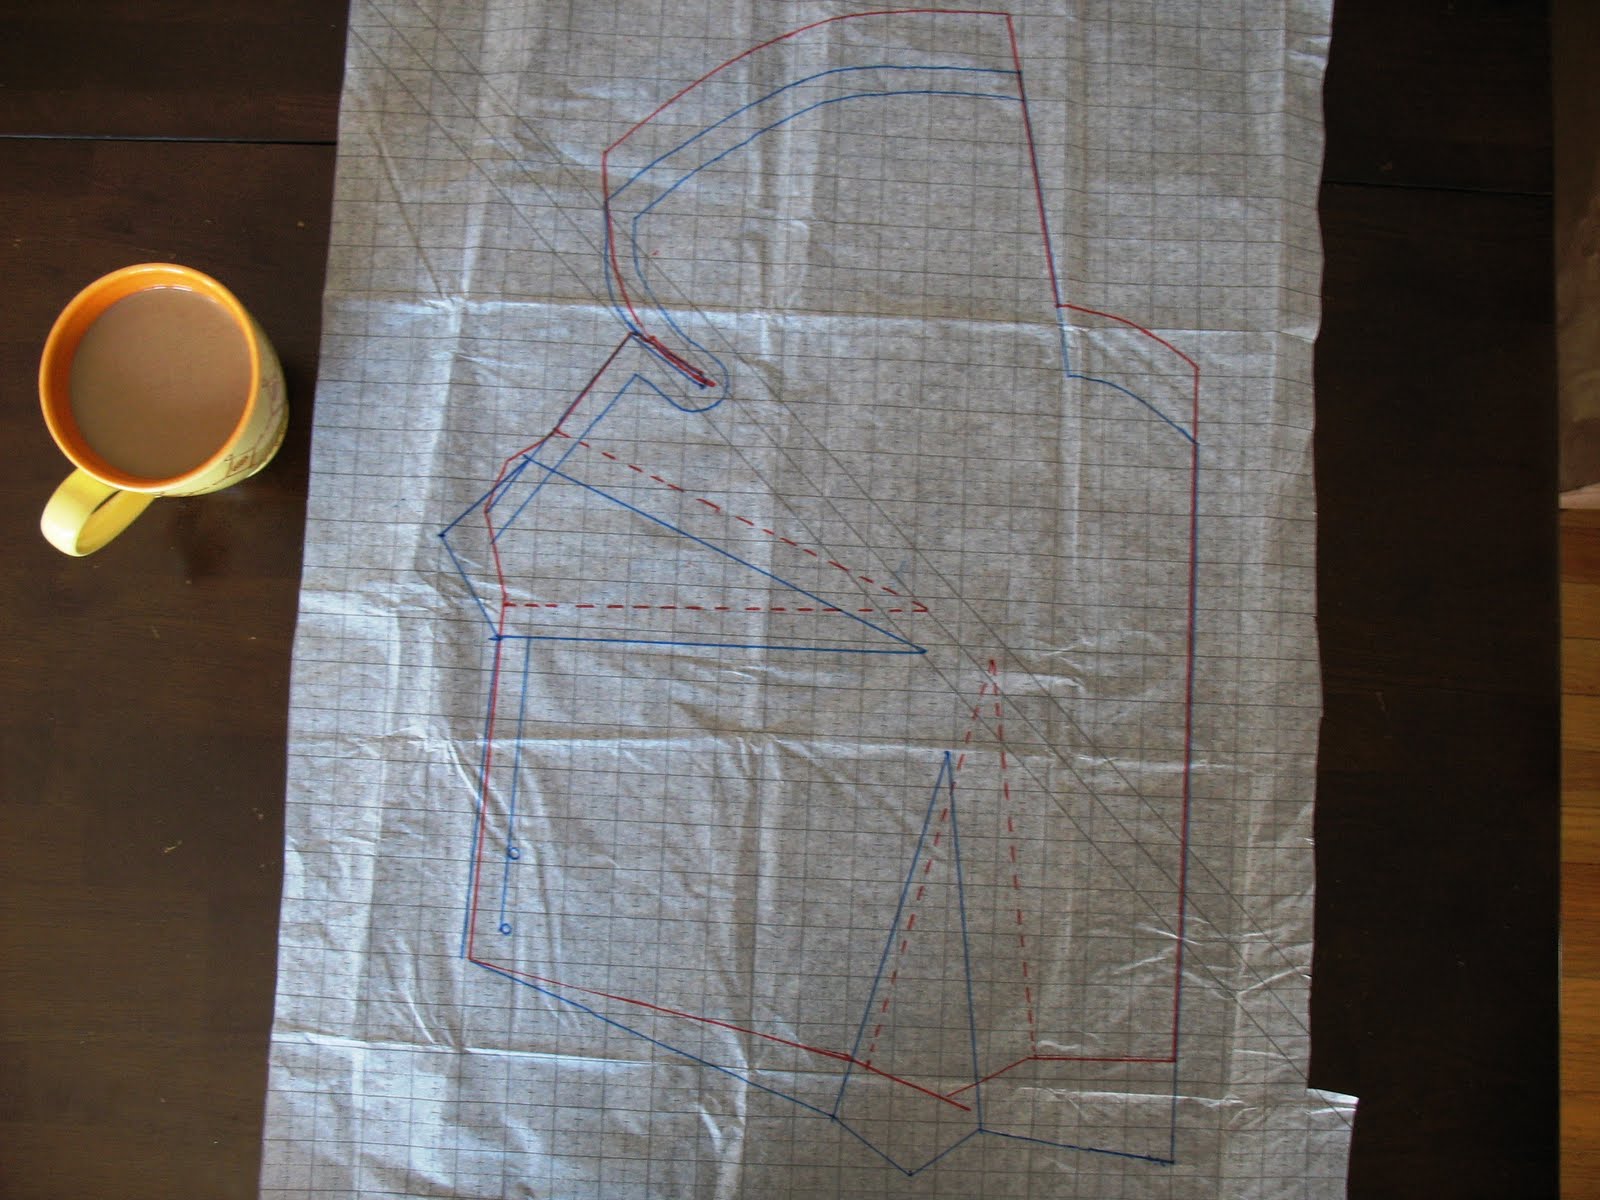
Bodice Front, comparison
* original pattern is in red, the new pattern with alterations is in blue

Front Changes:
1 inch Full Bust Adjustment
lowered bust dart 1 inch
1 inch "sway chest" tuck to shorten front chest length
lowered neckline 1 1/2 inches
decreased armhole depth by 5/8 inches
lowered front dart 2 inches
shifted front dart toward side seam by 1 1/2 inches
added 2 inches length to center front, tapered to original side seam

Bodice Back, altered original
Bodice Back, comparison
* original pattern is in red, the new pattern with alterations is in blue

Back Changes:

eliminated waist dart
3 inch tuck removed at shoulder, tapered to nothing at side seam
1 inch swayback tuck (proved to be an erroneous alteration, see below for details)

After about five hours of work today, muslin II is sewn and ready for analysis. It's not perfect, but I think there has been progress. It does needed tweaked again. I am hopeful I only need one more muslin to perfect this. Any and all suggestions are welcome.

Muslin II Bodice Back:
The back now lays nice and smoothly across my shoulders. The giant 3 inch tuck really eliminated the gaping shoulder issue. I also eliminated the back darts since I have a thick, straight midsection (no reason to nip gently in at the waist for me!). Both alterations worked well.

In Muslin I there was still some gaping and falling at the shoulders that I corrected by tucking the front bodice shorter in the chest. I am not entirely sure I have the alteration perfect, but I can positively say that the shoulders are a snug fit now. Everything stayed in place as it should.

I am concerned about that pull line at the shoulder, wrinkling from the armpit to the "bra strap area." Not sure where is too tight to cause that pull... I am wondering if perhaps the arm hole itself is a bit too small and I need to drop the side seem a tiny bit for ease...

Also, I made a swayback adjustment in this version that I need to correct. It turns out I should not have taken that tuck. I need that 1 inch back in order to allow the lower waist seem to run parallel to my waist. Even still, there is a bit of excess fabric under the shoulder blade. I wonder if I should put a new, smaller, angled waist dart in to control that poofing, but I might just wait and see if waist ties help the fit, rather than fiddle too much.

Muslin II Bodice Side:
The front armhole exhibits MUCH improved coverage since I made it shallower by 5/8 inch. You can really see the improvement on the first image of this post compared with Muslin I images. My bust dart is still too high, despite being lowered by an inch already. Also, the bodice is slightly blouse-y under the bust, I will try a curved dart to nip this area in a bit per Gertie's instructions. Plus, I know that in the final dress a sash will cover some of this area too. All in all, the side looks good.

Muslin II Bodice Front
* font darts pinned into a curved dart, which gives a more fitted (and I think flattering) fit.

I am really optimistic about this front fit. It looks better than most bodice fronts I work with. That said, the bust darts are still too high. I need to lower another inch or so. The waist darts look really good. I think they are in the right place under my bust. They could stand to be lowered another 1/2 inch, and made to curve for a snugger under bust fit, as seen in the second picture.

The shoulder and front chest are really looking pretty solid. There is a tiny bit of excess in my armpits, but if I tuck it out then it becomes hard to move my arms up, so perhaps this is the price for ease of wear?

There are diagonal drag lines between my left side dart and my right bust apex. My right bust is a bit fuller, and I think it is pulling the fabric. Not sure how to fix this, except I might sew my right bust dart a tiny bit shallower for more ease. The drag lines are eliminated when I curve the waist darts, so perhaps a combo of lowering and curing these darts will fix the pulling.

Areas of concern for version III include:

Back Shoulder: The inside shoulder, near my neck. It seems to be pulling. I usually need a high round back, but assumed I would not on this wrap back style. Could I need a little bit of a high round on the upper shoulder to release this pulling? Then again, is adding a high round back sort of like putting back some of that big tuck I took out at the shoulder... I do not want to undo progress.

Back Sleeve: The sleeve, as it seems to be pulling, especially on the lower armpit area. The interesting thing is that it does not bind or constrict at all as I wear it. It doesn't feel too tight, only looks it. I wonder if slightly lowering the side seam in the armpit by about 1/2 inches would ease some of the strain? I also wonder, alternatively, if redrafting a bit of the curve of the sleeve shape would help. It feels low, and when I look at the stitching line, it is odd because it kind of arches near the armpit, then dips lower around the outside arm. I think a gently, even curve might be more flattering. I will have to look at slightly redrafting the sleeve hem shape.

Front darts: They both need lowered, and the waist darts need curved for under bust definition.

Front neckline: I may or may not deepen this a little bit. Any

What issues do you see? Suggestions welcome and encouraged.

The Swayback Mistake, documented:

I did take a swayback adjustment between Muslin I and Muslin II, which proved an error. I thought I would document the alteration and the result for educational purposes.

Muslin I, no swayback tuck, yet:
Looking at the fit, I thought I saw excess fabric "puddling" around my back curve. I had already tucked out a big chunk in a tuck from the shoulder, and I thought these wrinkles indicated that a swayback tuck would also be in order.

Muslin I, tucked for a swayback
To test, I pinned out a swayback tuck in Muslin I to see how it affected fit. With the 1 inch swayback tuck, the wrinkles were gone and things looked in order. Looking back, I can now see a drag line of strain along the top edge of the bodice back, along the seam line, that I think indicates the swayback is pulling too much. But at the time I thought a new muslin would magically correct some of the wrinkles, since the pins would be gone.

Muslin II, pinned with swayback adjustment

This is Muslin II, which was cut with the swayback adjustment. As you can see, if I pin the back with the waist seams parallel, I end up with a wacky poof of excess of fabric in the lower back. The only way to eliminate this excess was to angle the back at an angle, leaving an angled "wedge" of not-overlapping fabric at the waist seam (see below). This wedge looks strangely familiar to the sway back tuck I took out of the pattern, leading me to think it needs added back.

Muslin II, pinned as though no swayback adjustment made
As you can see, if I allow the back pieces to overlap at an angle, I pull out some of that weird poofing. This makes me think the swayback was unnecessary. Only a Muslin II will tell.