
 Behold, Muslin II. I'm making progress. This should look familiar, but better. I have made many adjustments, and the bodice fits better then it started. Alas, I am not there yet. Read on for details about what I have done and what I have yet to do.
Bodice Front, altered original
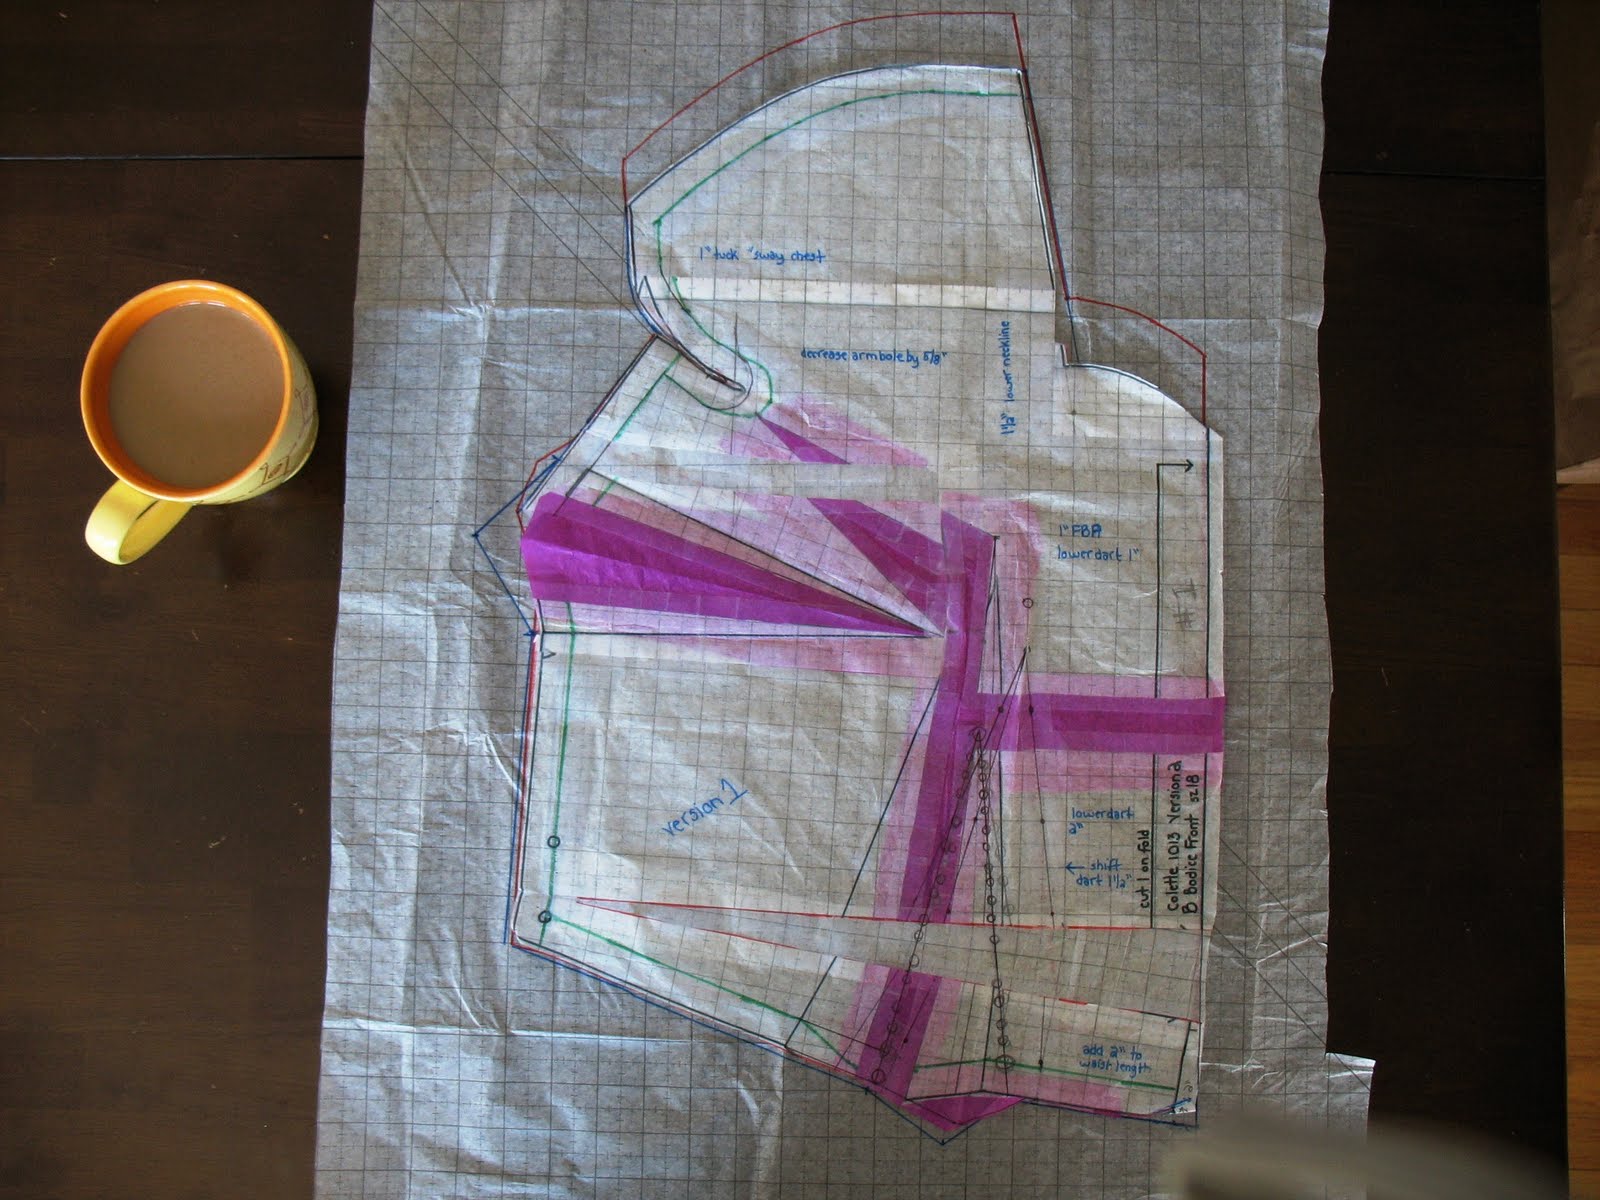 Bodice Front, comparison
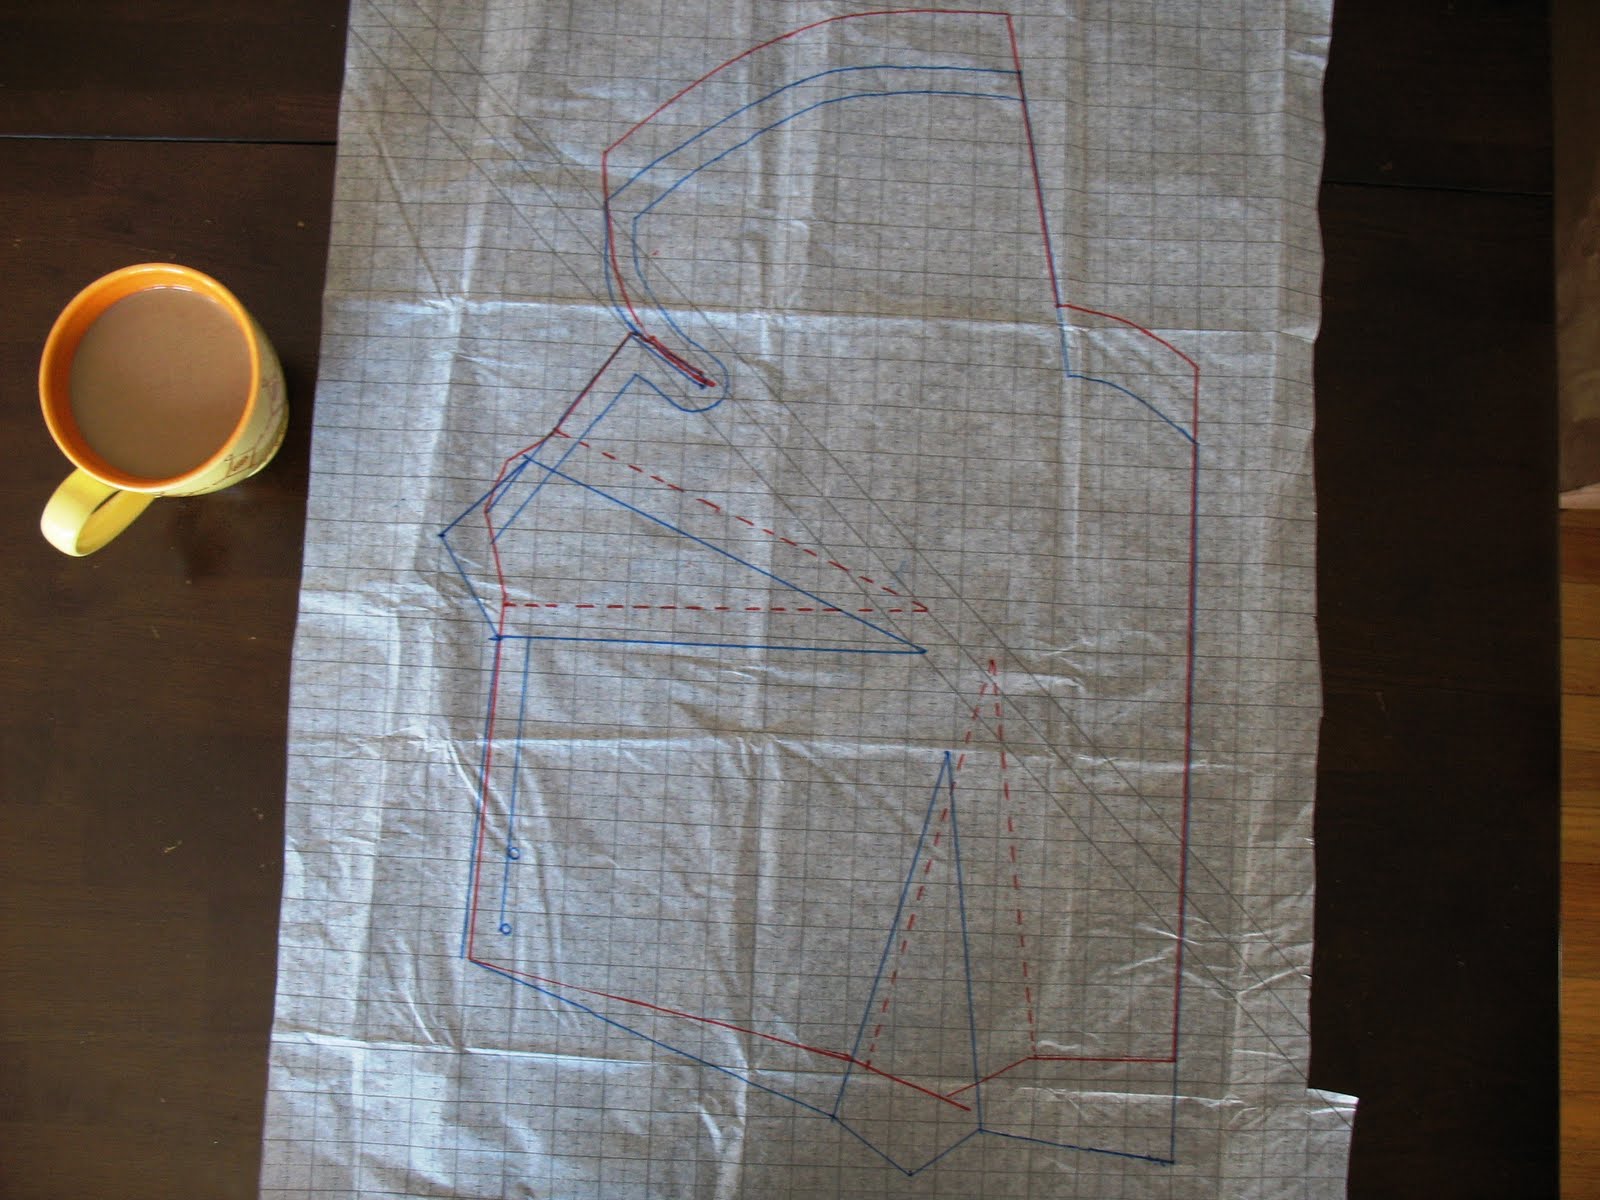 * original pattern is in red, the new pattern with alterations is in blue
Front Changes:
1 inch Full Bust Adjustment
lowered bust dart 1 inch
1 inch "sway chest" tuck to shorten front chest length
lowered neckline 1 1/2 inches
decreased armhole depth by 5/8 inches
lowered front dart 2 inches
shifted front dart toward side seam by 1 1/2 inches
added 2 inches length to center front, tapered to original side seam
Bodice Back, altered original
 Bodice Back, comparison
 * original pattern is in red, the new pattern with alterations is in blue
Back Changes:
eliminated waist dart
3 inch tuck removed at shoulder, tapered to nothing at side seam
1 inch swayback tuck (proved to be an erroneous alteration, see below for details)
After about five hours of work today, muslin II is sewn and ready for analysis. It's not perfect, but I think there has been progress. It does needed tweaked again. I am hopeful I only need one more muslin to perfect this. Any and all suggestions are welcome.
Muslin II Bodice Back:
 The back now lays nice and smoothly across my shoulders. The giant 3 inch tuck really eliminated the gaping shoulder issue. I also eliminated the back darts since I have a thick, straight midsection (no reason to nip gently in at the waist for me!). Both alterations worked well.
In Muslin I there was still some gaping and falling at the shoulders that I corrected by tucking the front bodice shorter in the chest. I am not entirely sure I have the alteration perfect, but I can positively say that the shoulders are a snug fit now. Everything stayed in place as it should.
I am concerned about that pull line at the shoulder, wrinkling from the armpit to the "bra strap area." Not sure where is too tight to cause that pull... I am wondering if perhaps the arm hole itself is a bit too small and I need to drop the side seem a tiny bit for ease...
Also, I made a swayback adjustment in this version that I need to correct. It turns out I should not have taken that tuck. I need that 1 inch back in order to allow the lower waist seem to run parallel to my waist. Even still, there is a bit of excess fabric under the shoulder blade. I wonder if I should put a new, smaller, angled waist dart in to control that poofing, but I might just wait and see if waist ties help the fit, rather than fiddle too much.
Muslin II Bodice Side:
 The front armhole exhibits MUCH improved coverage since I made it shallower by 5/8 inch. You can really see the improvement on the first image of this post compared with Muslin I images. My bust dart is still too high, despite being lowered by an inch already. Also, the bodice is slightly blouse-y under the bust, I will try a curved dart to nip this area in a bit per Gertie's instructions. Plus, I know that in the final dress a sash will cover some of this area too. All in all, the side looks good.
Muslin II Bodice Front

 * font darts pinned into a curved dart, which gives a more fitted (and I think flattering) fit.
I am really optimistic about this front fit. It looks better than most bodice fronts I work with. That said, the bust darts are still too high. I need to lower another inch or so. The waist darts look really good. I think they are in the right place under my bust. They could stand to be lowered another 1/2 inch, and made to curve for a snugger under bust fit, as seen in the second picture.
The shoulder and front chest are really looking pretty solid. There is a tiny bit of excess in my armpits, but if I tuck it out then it becomes hard to move my arms up, so perhaps this is the price for ease of wear?
There are diagonal drag lines between my left side dart and my right bust apex. My right bust is a bit fuller, and I think it is pulling the fabric. Not sure how to fix this, except I might sew my right bust dart a tiny bit shallower for more ease. The drag lines are eliminated when I curve the waist darts, so perhaps a combo of lowering and curing these darts will fix the pulling.
Areas of concern for version III include:
Back Shoulder: The inside shoulder, near my neck. It seems to be pulling. I usually need a high round back, but assumed I would not on this wrap back style. Could I need a little bit of a high round on the upper shoulder to release this pulling? Then again, is adding a high round back sort of like putting back some of that big tuck I took out at the shoulder... I do not want to undo progress.
Back Sleeve: The sleeve, as it seems to be pulling, especially on the lower armpit area. The interesting thing is that it does not bind or constrict at all as I wear it. It doesn't feel too tight, only looks it. I wonder if slightly lowering the side seam in the armpit by about 1/2 inches would ease some of the strain? I also wonder, alternatively, if redrafting a bit of the curve of the sleeve shape would help. It feels low, and when I look at the stitching line, it is odd because it kind of arches near the armpit, then dips lower around the outside arm. I think a gently, even curve might be more flattering. I will have to look at slightly redrafting the sleeve hem shape.
Front darts: They both need lowered, and the waist darts need curved for under bust definition.
Front neckline: I may or may not deepen this a little bit. Any
What issues do you see? Suggestions welcome and encouraged.
The Swayback Mistake, documented:
I did take a swayback adjustment between Muslin I and Muslin II, which proved an error. I thought I would document the alteration and the result for educational purposes.
Muslin I, no swayback tuck, yet:
 Looking at the fit, I thought I saw excess fabric "puddling" around my back curve. I had already tucked out a big chunk in a tuck from the shoulder, and I thought these wrinkles indicated that a swayback tuck would also be in order.
Muslin I, tucked for a swayback
 To test, I pinned out a swayback tuck in Muslin I to see how it affected fit. With the 1 inch swayback tuck, the wrinkles were gone and things looked in order. Looking back, I can now see a drag line of strain along the top edge of the bodice back, along the seam line, that I think indicates the swayback is pulling too much. But at the time I thought a new muslin would magically correct some of the wrinkles, since the pins would be gone.
Muslin II, pinned with swayback adjustment
 This is Muslin II, which was cut with the swayback adjustment. As you can see, if I pin the back with the waist seams parallel, I end up with a wacky poof of excess of fabric in the lower back. The only way to eliminate this excess was to angle the back at an angle, leaving an angled "wedge" of not-overlapping fabric at the waist seam (see below). This wedge looks strangely familiar to the sway back tuck I took out of the pattern, leading me to think it needs added back.
Muslin II, pinned as though no swayback adjustment made
 As you can see, if I allow the back pieces to overlap at an angle, I pull out some of that weird poofing. This makes me think the swayback was unnecessary. Only a Muslin II will tell.


3 comments:
That's an amazing amount of work! but your muslin is looking much better. Is this the first time you've done such extensive alterations on a bodice? I'm doing a similar project, and slowly finding that I'm learning what I need to change before I even cut out the first muslin. Keep up the good work!
Thanks for all your documentation and pictures...And thanks for your comments on my flickr pictures. I am going to do more work on this over the weekend, when I have time to think....
Wow, you've done a lot of work! I'm utterly humbled (newbie). It's so helpful to see and read about everyone's changes, though.
Post a Comment