Showing posts with label full bust adjustment. Show all posts

Saturday, February 12, 2011

Crepe Sewalong: Muslin IV and IV.5

Progress = Thumbs up! I am so close to finalizing this Crepe bodice that I can almost, just almost, see the finished project in my mind. This yellow gingham version is my fourth muslin. It features the shortened side and waist darts, deeper and reshaped armpit seams, and a lowered and widened neckline. As you will see, it still requires some additional tweaks. However, all in all, I am getting close.

Observe below for more photos and analysis. And PLEASE chime in with advice and fit tips. In this home stretch, I don't want to leave anything unaltered that might need to be.

Muslin IV:
This version IV features significantly shortened vertical darts that have been curved to nip in fullness under the bust. But I am not sure they are exactly correct. They are so short that they end before my bust starts, and therefore are no longer fitting the bust area. Rather, they are releasing into a significant "poof" of fuller fabric around the low bust. I made some changes to try and correct this, see Muslin IV.5 below.

Another issue is the bodice hemline, it's all wacky and slanted, due to my over-zealous alterations. I had been attempting to lengthen the front bodice without altering the side seams at all (as I think the back length is correct). So I opened a horizontal dart/wedge from the lower side seam to the center front, adding a gradual 3 inches of length to the center front (you can see the pattern alteration here). However, what I have ended up with is a bodice pattern that is about 3 inches or more longer at the center front than at the side seam. Go figure!? You can really see this on the profile picture below. I still do think I need extra length on the front to pull down over my roundish belly, so I wonder if I could create a long, swooping "U" shape to the curve of the lower bodice, to allow more length. Because I have taken length out the shoulders it makes sense I might need to add it back to the front and back.

The armhole fits much better now that i have lowered everything and adjusted the shoulder seam. The bust dart is still too high, it just keeps getting moved up as I play with the shoulders. I may move it down another inch or so to put it back at the apex, but i don't think its the worst thing in the world here either.

I am getting drag lines from the apex to the side seams, not sure exactly why but I am certain it has to do with having a very full bust. The interesting thing is that the bodice does not feel too tight. I don't feel binding or pulling. I just see it. I am not sure the best way to correct this, and may just leave it as is and call it a consequence of my bust size. But if you have a good idea for correcting, let me know.

The back is looking pretty darn good, except for two main issues:

1) The back darts are too center-back for my aesthetics. They are running parallel to my spinal column, just a few inches outside each side of my spine. If you remember in the earlier muslin stages, I had removed the back darts to accommodate my wide waist. However, I put them back in to gather up some of the extra fabric I found in the back. So these darts were pinched out of the back to pull up the fabric exactly where the fabric wanted to be gathered. Therefore I worry about moving them. Any advice?

2) There remains excess and bunching over the shoulder blade. It's not terrible, but also not great. When I asked my husband if he could help me pinch it out and pin it so that I could try to figure out the necessary alteration, he got sort of finicky and told me the bodices looked really good and to stop being a perfectionist. However, I have already made FOUR muslins, and I am not about to quit when something is not quite right. So what do you think?

Below is my current solution to the back shoulder blade bunching AND the issue with the darts. I appreciate any feedback you can offer.

Muslin IV.5 (basically, Muslin IV with new darts and the back pinched up):

So, this is the muslin with the front waist darts altered back to a standard inverted "V" shaped dart (as opposed to the shorter curved darts of version IV). I tried one lower (my left, your right), and one higher (my right, your left). I like the look of the higher dart that is nearly at my apex. Other than adjusting the darts and the hem length, I am feeling good about this fit.

I do still need to work on the back a bit more. The excess over the excess at the upper shoulder and upper arm bugs me. It's just not perfect yet. (Also, I want you all to know that I admit upon reviewing these pictures that I had the ties pulled a bit to tightly. There is a lot of pulling around the darts and waistline. Although the bodice did not feel too tight, it surely looks it. I think a bit more ease in the ties will help this.)

To try and figure out the needed adjustment, I pinned out a tuck across the entire back shoulder blade about an inch deep, perpendicular to the grain line. On my body, you can see the tuck curve down near my outer arm, although the actual alteration was straight across. This seems to have lessened the excess in the back without restricting movement or binging mobility.

Finally, I believe the bodice front and back both need lengthened by an inch or two, to accommodate both for these tucks in the upper chest/back and the straightening of the shoulder seam. Also, I want to give the dress room for the length that will come up when the skirt is attached.

I plan to work on these alterations a bit more this weekend and hopefully trace a final pattern noting all the alterations on Sunday. In this home stretch, any advice is appreciated. Let me know your fit thoughts and advice. Thanks!

Sunday, December 19, 2010

Crepe Sewalong: Muslin II

Behold, Muslin II. I'm making progress. This should look familiar, but better. I have made many adjustments, and the bodice fits better then it started. Alas, I am not there yet. Read on for details about what I have done and what I have yet to do.

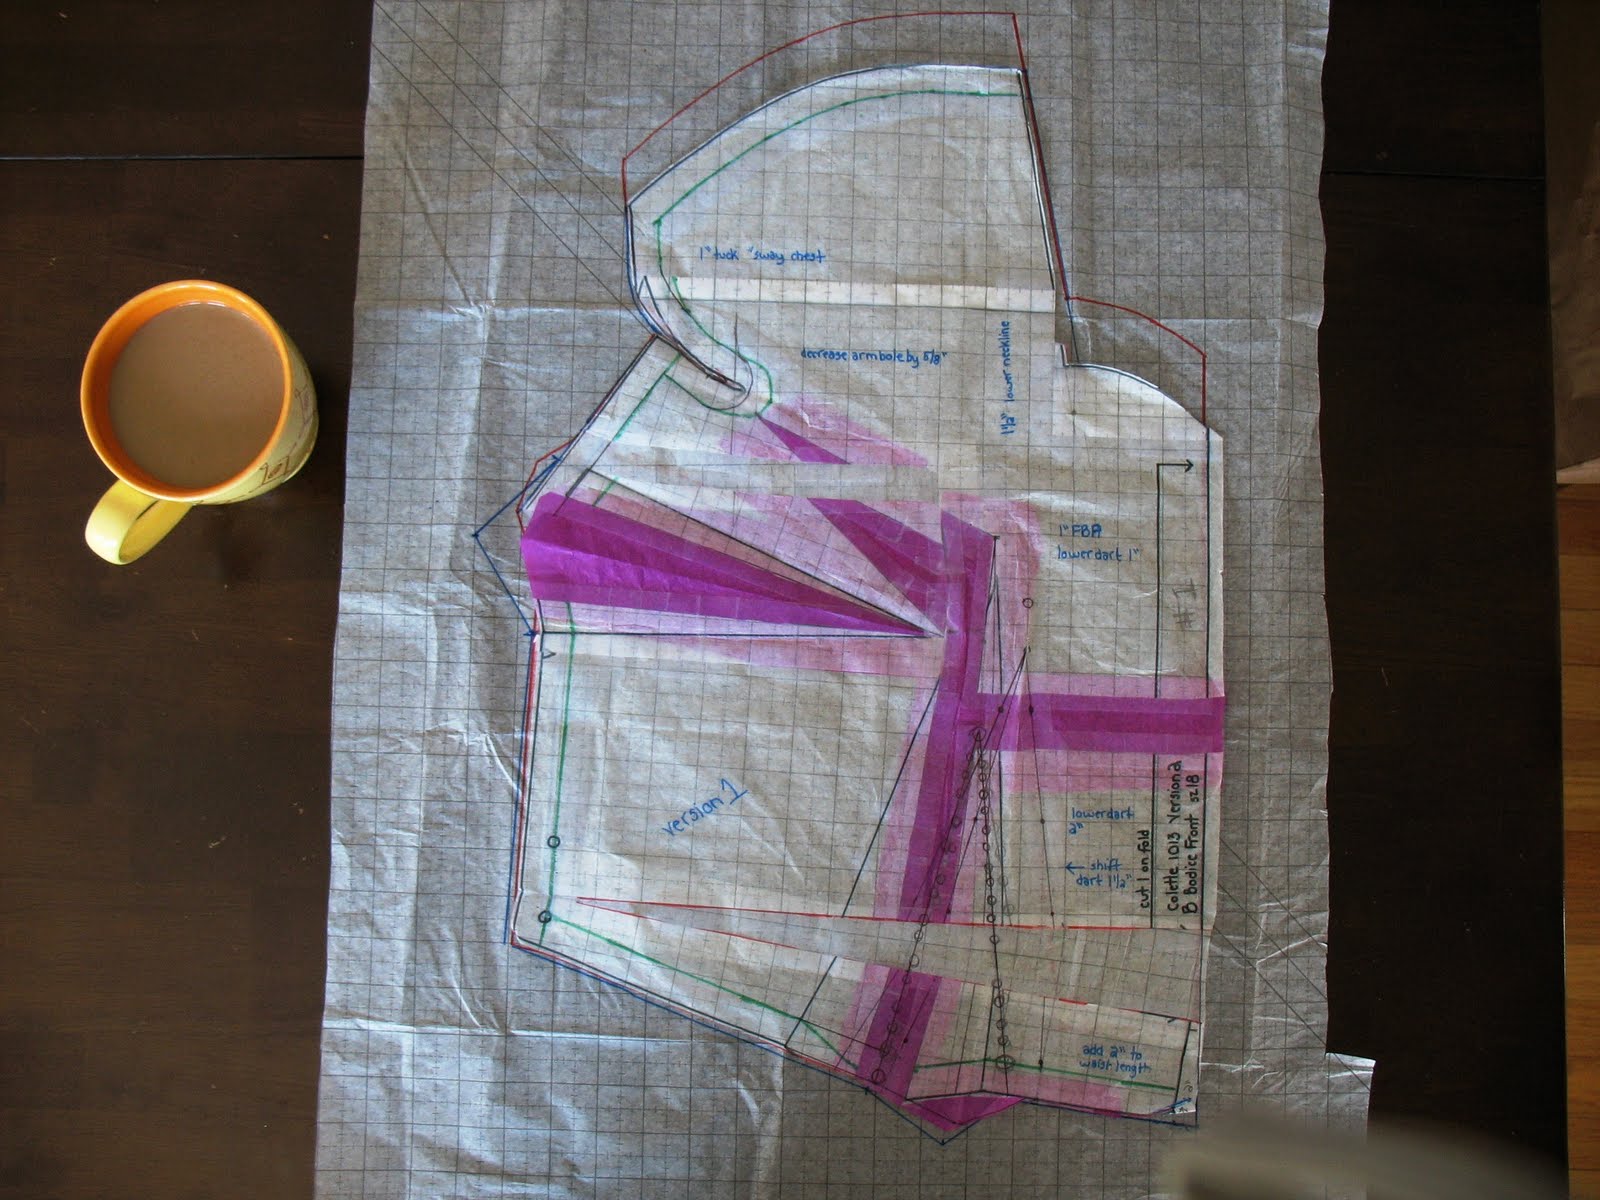
Bodice Front, altered original
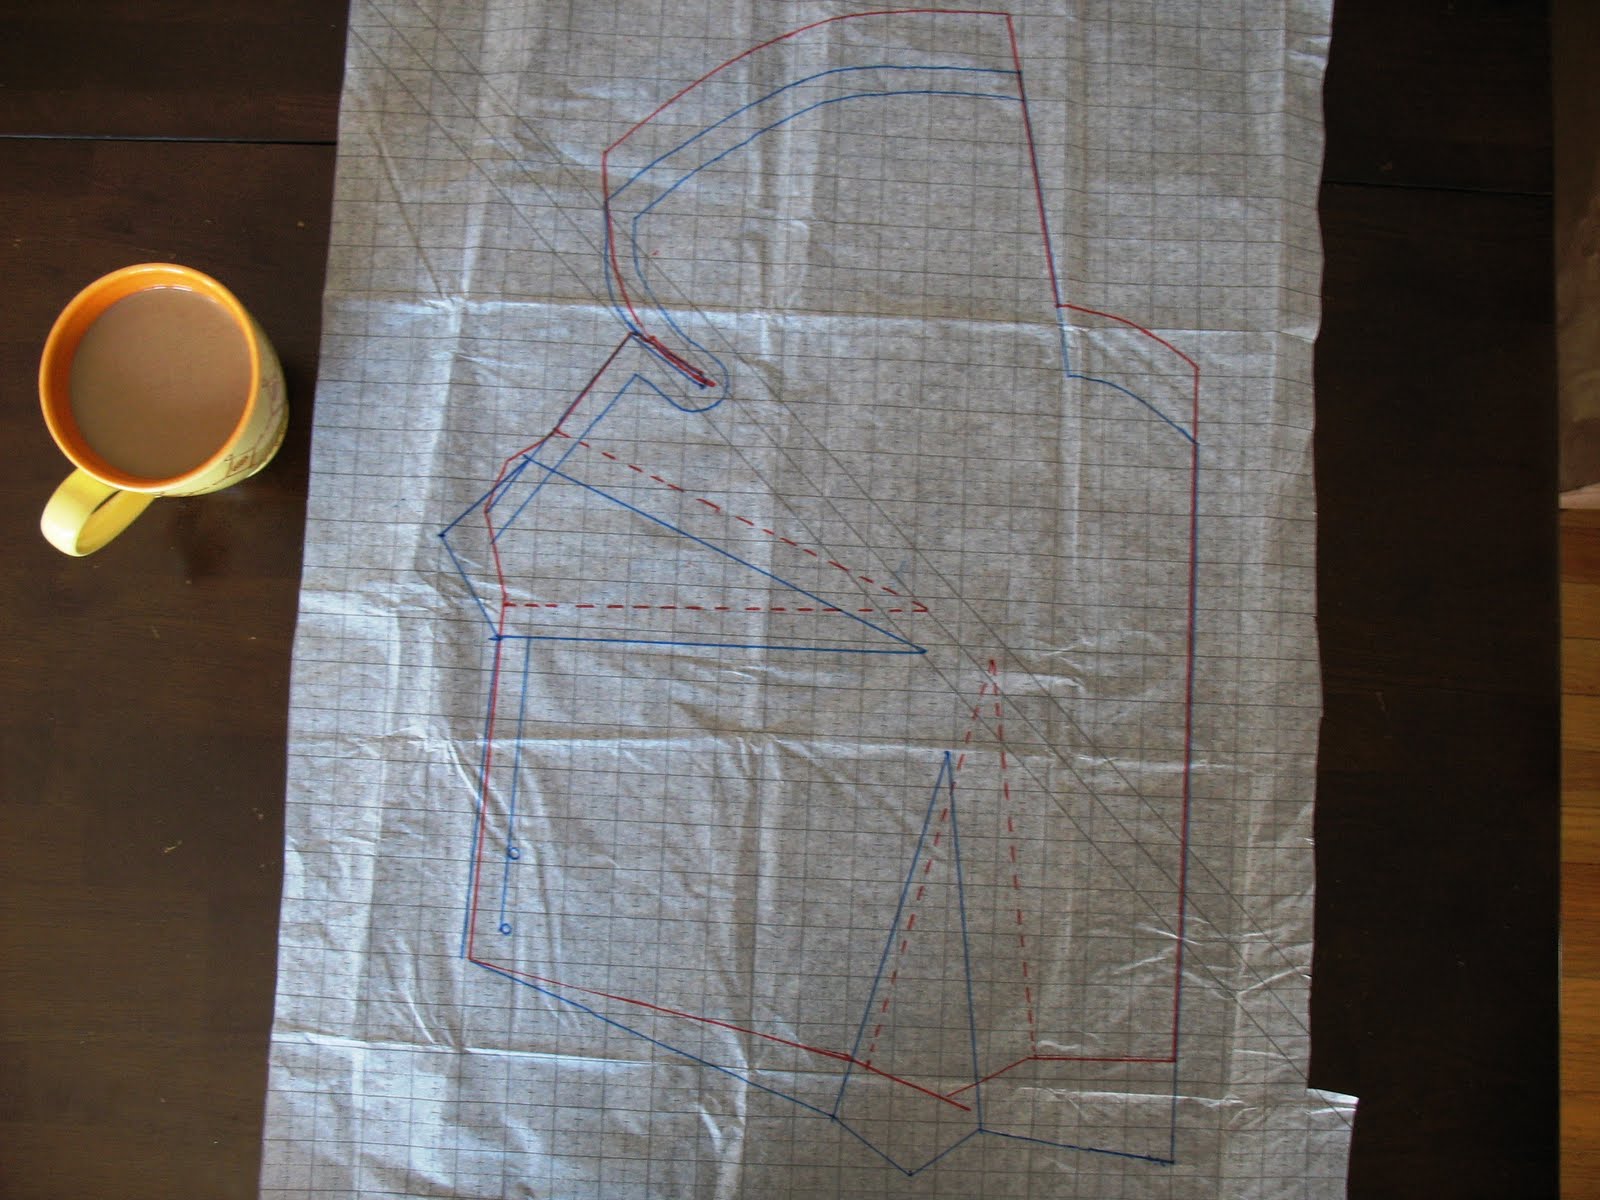
Bodice Front, comparison
* original pattern is in red, the new pattern with alterations is in blue

Front Changes:
1 inch Full Bust Adjustment
lowered bust dart 1 inch
1 inch "sway chest" tuck to shorten front chest length
lowered neckline 1 1/2 inches
decreased armhole depth by 5/8 inches
lowered front dart 2 inches
shifted front dart toward side seam by 1 1/2 inches
added 2 inches length to center front, tapered to original side seam

Bodice Back, altered original
Bodice Back, comparison
* original pattern is in red, the new pattern with alterations is in blue

Back Changes:

eliminated waist dart
3 inch tuck removed at shoulder, tapered to nothing at side seam
1 inch swayback tuck (proved to be an erroneous alteration, see below for details)

After about five hours of work today, muslin II is sewn and ready for analysis. It's not perfect, but I think there has been progress. It does needed tweaked again. I am hopeful I only need one more muslin to perfect this. Any and all suggestions are welcome.

Muslin II Bodice Back:
The back now lays nice and smoothly across my shoulders. The giant 3 inch tuck really eliminated the gaping shoulder issue. I also eliminated the back darts since I have a thick, straight midsection (no reason to nip gently in at the waist for me!). Both alterations worked well.

In Muslin I there was still some gaping and falling at the shoulders that I corrected by tucking the front bodice shorter in the chest. I am not entirely sure I have the alteration perfect, but I can positively say that the shoulders are a snug fit now. Everything stayed in place as it should.

I am concerned about that pull line at the shoulder, wrinkling from the armpit to the "bra strap area." Not sure where is too tight to cause that pull... I am wondering if perhaps the arm hole itself is a bit too small and I need to drop the side seem a tiny bit for ease...

Also, I made a swayback adjustment in this version that I need to correct. It turns out I should not have taken that tuck. I need that 1 inch back in order to allow the lower waist seem to run parallel to my waist. Even still, there is a bit of excess fabric under the shoulder blade. I wonder if I should put a new, smaller, angled waist dart in to control that poofing, but I might just wait and see if waist ties help the fit, rather than fiddle too much.

Muslin II Bodice Side:
The front armhole exhibits MUCH improved coverage since I made it shallower by 5/8 inch. You can really see the improvement on the first image of this post compared with Muslin I images. My bust dart is still too high, despite being lowered by an inch already. Also, the bodice is slightly blouse-y under the bust, I will try a curved dart to nip this area in a bit per Gertie's instructions. Plus, I know that in the final dress a sash will cover some of this area too. All in all, the side looks good.

Muslin II Bodice Front
* font darts pinned into a curved dart, which gives a more fitted (and I think flattering) fit.

I am really optimistic about this front fit. It looks better than most bodice fronts I work with. That said, the bust darts are still too high. I need to lower another inch or so. The waist darts look really good. I think they are in the right place under my bust. They could stand to be lowered another 1/2 inch, and made to curve for a snugger under bust fit, as seen in the second picture.

The shoulder and front chest are really looking pretty solid. There is a tiny bit of excess in my armpits, but if I tuck it out then it becomes hard to move my arms up, so perhaps this is the price for ease of wear?

There are diagonal drag lines between my left side dart and my right bust apex. My right bust is a bit fuller, and I think it is pulling the fabric. Not sure how to fix this, except I might sew my right bust dart a tiny bit shallower for more ease. The drag lines are eliminated when I curve the waist darts, so perhaps a combo of lowering and curing these darts will fix the pulling.

Areas of concern for version III include:

Back Shoulder: The inside shoulder, near my neck. It seems to be pulling. I usually need a high round back, but assumed I would not on this wrap back style. Could I need a little bit of a high round on the upper shoulder to release this pulling? Then again, is adding a high round back sort of like putting back some of that big tuck I took out at the shoulder... I do not want to undo progress.

Back Sleeve: The sleeve, as it seems to be pulling, especially on the lower armpit area. The interesting thing is that it does not bind or constrict at all as I wear it. It doesn't feel too tight, only looks it. I wonder if slightly lowering the side seam in the armpit by about 1/2 inches would ease some of the strain? I also wonder, alternatively, if redrafting a bit of the curve of the sleeve shape would help. It feels low, and when I look at the stitching line, it is odd because it kind of arches near the armpit, then dips lower around the outside arm. I think a gently, even curve might be more flattering. I will have to look at slightly redrafting the sleeve hem shape.

Front darts: They both need lowered, and the waist darts need curved for under bust definition.

Front neckline: I may or may not deepen this a little bit. Any

What issues do you see? Suggestions welcome and encouraged.

The Swayback Mistake, documented:

I did take a swayback adjustment between Muslin I and Muslin II, which proved an error. I thought I would document the alteration and the result for educational purposes.

Muslin I, no swayback tuck, yet:
Looking at the fit, I thought I saw excess fabric "puddling" around my back curve. I had already tucked out a big chunk in a tuck from the shoulder, and I thought these wrinkles indicated that a swayback tuck would also be in order.

Muslin I, tucked for a swayback
To test, I pinned out a swayback tuck in Muslin I to see how it affected fit. With the 1 inch swayback tuck, the wrinkles were gone and things looked in order. Looking back, I can now see a drag line of strain along the top edge of the bodice back, along the seam line, that I think indicates the swayback is pulling too much. But at the time I thought a new muslin would magically correct some of the wrinkles, since the pins would be gone.

Muslin II, pinned with swayback adjustment

This is Muslin II, which was cut with the swayback adjustment. As you can see, if I pin the back with the waist seams parallel, I end up with a wacky poof of excess of fabric in the lower back. The only way to eliminate this excess was to angle the back at an angle, leaving an angled "wedge" of not-overlapping fabric at the waist seam (see below). This wedge looks strangely familiar to the sway back tuck I took out of the pattern, leading me to think it needs added back.

Muslin II, pinned as though no swayback adjustment made
As you can see, if I allow the back pieces to overlap at an angle, I pull out some of that weird poofing. This makes me think the swayback was unnecessary. Only a Muslin II will tell.

Thursday, December 16, 2010

Crepe Sewalong: Muslin I

Crepe Dress Muslin I complete and ready for critique. It's not perfect, it's not abysmal, and my general consensus is that just like Palmber/Pletsch suggests, it is important to fit the back first. Notes on each area below. Comments welcome and encouraged.

Note: I made one change to the pattern before the fabric muslin by completing a 1 inch Full Bust Adjustment, which also meant redrafting the waist darts. I retained the waist dart's original size, which also gave me a 1 inch wide waist adjustment, adding some width around my middle.

Original Muslin I - No Changes (yet): A glaring issue with the back surfaced right away, so rather than critique the fit before my first round of necessary alterations to the back, I waited to critique the front, side, and back fit until after fixing the glaring issue. Read on for the "post-tuck" summary for further fit analysis.

Fabric Muslin Front - no changes (yet)

Notice how the shoulders are falling out and away (exposing my bra!), and leaving the neckline too wide? This is because the back is too big. See below for images of the too big back, the tucks, and the front neckline after the back excess is tucked out. Things improve. Remember, fit the back and you often also succeed in fitting the front!

Fabric Muslin Side - no changes (yet)
Fabric Muslin Back - no changes (yet)
The back obviously needs some work, so I choose to adjust the excess at the shoulder blades before worrying about the front fit. After all, fixing the back will change the shoulder fit, which will ultimately change the chest and front fit. Remember, fix the back first, make a new muslin, and then once the back is well fit, look to changes in the front.

Post-back tucks:

Back with Tucks (two different types of tucks)
I took two tuck styles. The diagonal tuck I describe below is on your left (my left too, since this is the back). The horizontal tuck I describe below is on your right (my right too!). My husband helped me pin out the excess on the back, and his instinct was to tuck out excess in a diagonal, as on the left. My instinct was to take a horizontal tuck out of the shoulder blade, as on the right. Both tucks are drafted to taper to nothing in the sleeve/arm area, much like a swayback adjustment. So, which type of tuck is better?

I should also note that the waist darts in the back are oddly placed on me. They are waaaaay too far toward the side seem. I should either eliminate them (the choice I am leaning towards), or move them under my shoulder blade, about 3 inches closer to center.

I also need a bit more length on the wrap, so I may just add about 2 inches to the edge where the wraps attache and true up the back angle. I will wait to release the darts and see what I need in added length.

Diagonal Tuck
This diagonal tuck actually retained the seam line of the back (it looks off, because the upper seam allowance above the tuck is folded in, while below the tuck the seam allowance is out. In reality, the stitching line matches perfectly.). I am not sure yet how this shape/angle of tuck affects the grain line of the pattern layout. However, it seems to be superior in wrangling in fabric around the armpit area.

Horizontal Tuck
The horizontal tuck is closer to a Palmer/Pletsch alteration style, and I think that might be because this type of tuck retains the grain line of the fabric better. However, the horizontal tuck does seem to leave odd bunching and excess both above the tuck near the armpit, and below the tuck along the back. I see a swayback adjustment in the future. My instinct in leaning toward the diagonal tuck on the other shoulder. What do you think?

Front with Tucks
This is a font image with the back excesses tucked out. (Also remember, the is the fabric muslin includes a 1 inch Full Bust adjustment). The front fit through the shoulders and chest was instantaneously corrected by decreasing the size of the back with the tucks. Both sets of darts are still to high, although the Full Bust Adjustment did lower the dart by about an inch and a half, making it much closer to my apex than before (you can see this clearly in the side views, below). The bust dart still needs lowered by about 1/2 inch. The waist darts are both too far center, and too long. There is a little bit of pulling in the center between the two darts and towards my fuller right side. I may need to let out the waist dart slightly to accommodate this.

Side with Tucks
You can see how the bust dart is slightly higher than my apex here. It should be an easy fix. The front of the bodice is shorter than the back. I believe I need to add some length to the center front, tapering to nothing at the side seem. this is surely because I have a full waist, hence more fabric is needed to cover it. Easy fix. I am also a bit concerned about the armpit area, as it seems to pull and gape forward a bit. I expect redrafting that armpit curve by making it more shallow will work wonders.

Any other thoughts? Please share.

Wednesday, December 15, 2010

Crepe Sewalong: Tissue Fit I

The Crepe Dress is progressing nicely. I have completed the first dreadful part, tracing and marking the pattern. Things always get better after this first step. Next, the tissue fit. You can see my progress here.

I am pretty impressed with the fit in the front. That dart is too high, but I am going to wait until after my Full Bust Adjustment to worry about it, as the FBA drops the dart position. I know I will need to bring that waist dart down a bit too, it is nearly overlapping my apex. However, I noticed I have other shirts in my closet with a high side bust dart, and part of me wonders if the drafting purposefully placed the darts this high, to somehow wrangle in the fabric and fit in the armpit/cap sleeve area. I hope watching other people's fitting and alterations in the Flickr group will help me figure this out.

As you can see, the center front does not totally reach my center front, but it is not abysmally far off ether. I am doing a small 1" Full Bust Adjustment, which is refreshing for me. I usually have to do more than 2 inches, sometimes up to four inches. This smaller bust adjustment means less weird contortions to the rest of the pattern, which should simplify fit later. Keep your fingers crossed on my behalf.

Thankfully, the center front looks pretty even all the way along my center front, which means I may not have too much of a wide waist issue to tweak. Again, I'll see after the full bust adjustment. The shoulder seems fine, the neckline width looks pretty good. I hesitate to be so optimistic, but this might be an easy fit!

Even the side seam is in the right position! It's not torquing too much toward the center front at the waist. Again, great sign.

The back looks pretty good. No high round back, since the deep V in the back wrap avoids my upper back. The only off putting thing is that the back dart is way over in my armpit. I am not sure that is the correct position. I may need to move it under my shoulder blade, or eliminate it all together to add a bit more length across the waist. The tissue is also gaping a bit in the shoulder blade area. I might just tuck that out of the pattern like one would for a sway back adjustment.

Next up, the fabric muslin fit. Onward and forward we go!

Wednesday, December 1, 2010

Sencha Blouse: Muslin #1 tweaks

Since I last photographed my progress on the Sencha Blouse Muslin #1, I added the neck facings with a 1.5 inch seem, which pleasantly opened up the neckline a bit. This was an improvement. I also tucked down the sleeve self-facings, and was remarkably impressed by the drafting of the pattern. Everything folded into a beautiful little cap sleeves, and it was so easy!

However, the bodice felt long in the back (You can see a photo of the Muslin #1 back, front and sides here, with a highlight of the puddling along the lower shoulder blade area). It was like I needed a mid-back "swayback" adjustment, or perhaps to shorten the bodice length all together.

Also, the front just felt too big (see photo here). This was in part because the front tucks needed deepened and moved. It was also because there continued to be excess fabric up above my bust, in my upper bust "hollow". I had already taken one substantial tuck out of this area to remove excess fabric, in what I call my "sway chest" adjustment, but perhaps it needs more?

So I redrafted the front tucks, making them MUCH deeper (each one is about 2 inches deep now) and moving them closer to center front. I also adjusted their angle and shape. The original tucks were deeper at the waist and then narrowed to add room for the hips. I am thick the whole way down, so my tucks are nearly even columns now. I also took the whole bit up at the shoulders by about 3/4 an inch in the front and back.

The front with re-drafted tucks and shoulders taken up. Now it is a bit too tight.
Also, it's pulling to the right, enhancing an unfortunate lopsided effect. Doh.

The back with the shoulders take up. The take up seemed to correct the excess material in the back, however a high swayback adjustment would probably achieve the same results without constricting the armholes.

Unfortunately, the whole blouse is now a wee bit tight, both across the chest and under the arms. You can see the strain across bust, especially where the front is torching toward my slightly bustier side (gah! asymmetry!). So I need to do one of a few things. Either 1) let the shoulders back out, and consider taking a tuck above the bust and in the mid back to correct the excess, or 2) leave the shoulders as is, but lower the armhole by 3/4 inch and lower the bust darts too, as needed. I think I might start by letting the shoulder back out. Even with the shoulder back down, the tucks still may need shifted down to give some breathing and blousing room to the bust.

Here is a big question though. I am starting to doubt my choice to eliminate the side dart created in the full bust adjustment (if you remember, I moved the dart into the waist tucks). Perhaps I would have been better served to leave at least some side dart, for better bust fit. Then again, it will be an ordeal to start from scratch. Decisions, decisions, decisions.

I do remain pleased that the side seems appear to be falling as they should.
So often I see a curve in the seem line in the shape of a sideways "m" where the seems is pulling first across my bust, then straightening, then pulling forward again around my midsection. This seem seems to fall almost perfectly down.

Monday, November 8, 2010

Sencha Blouse: Muslin #1

Yeah. Moderate success. Hope springs eternal. I CAN and I WILL have a successful Sencha blouse fitted and sewn in fashion fabric one of these days soon. And once I get the pattern right, I plan to sew up about eight of these babies and wear them every day, for every occasion. I will be comfortable and look classy AND have a do-it-yourself practicality.

However, because I love to self-torture, and because I have some perfectionist instincts, I have circled and noted all areas for concern and further modification above. Individual photos with some notes are also below for your viewing pleasure. And if you scroll to the bottom, I have found many examples of successful Senchas to provide further inspiration.

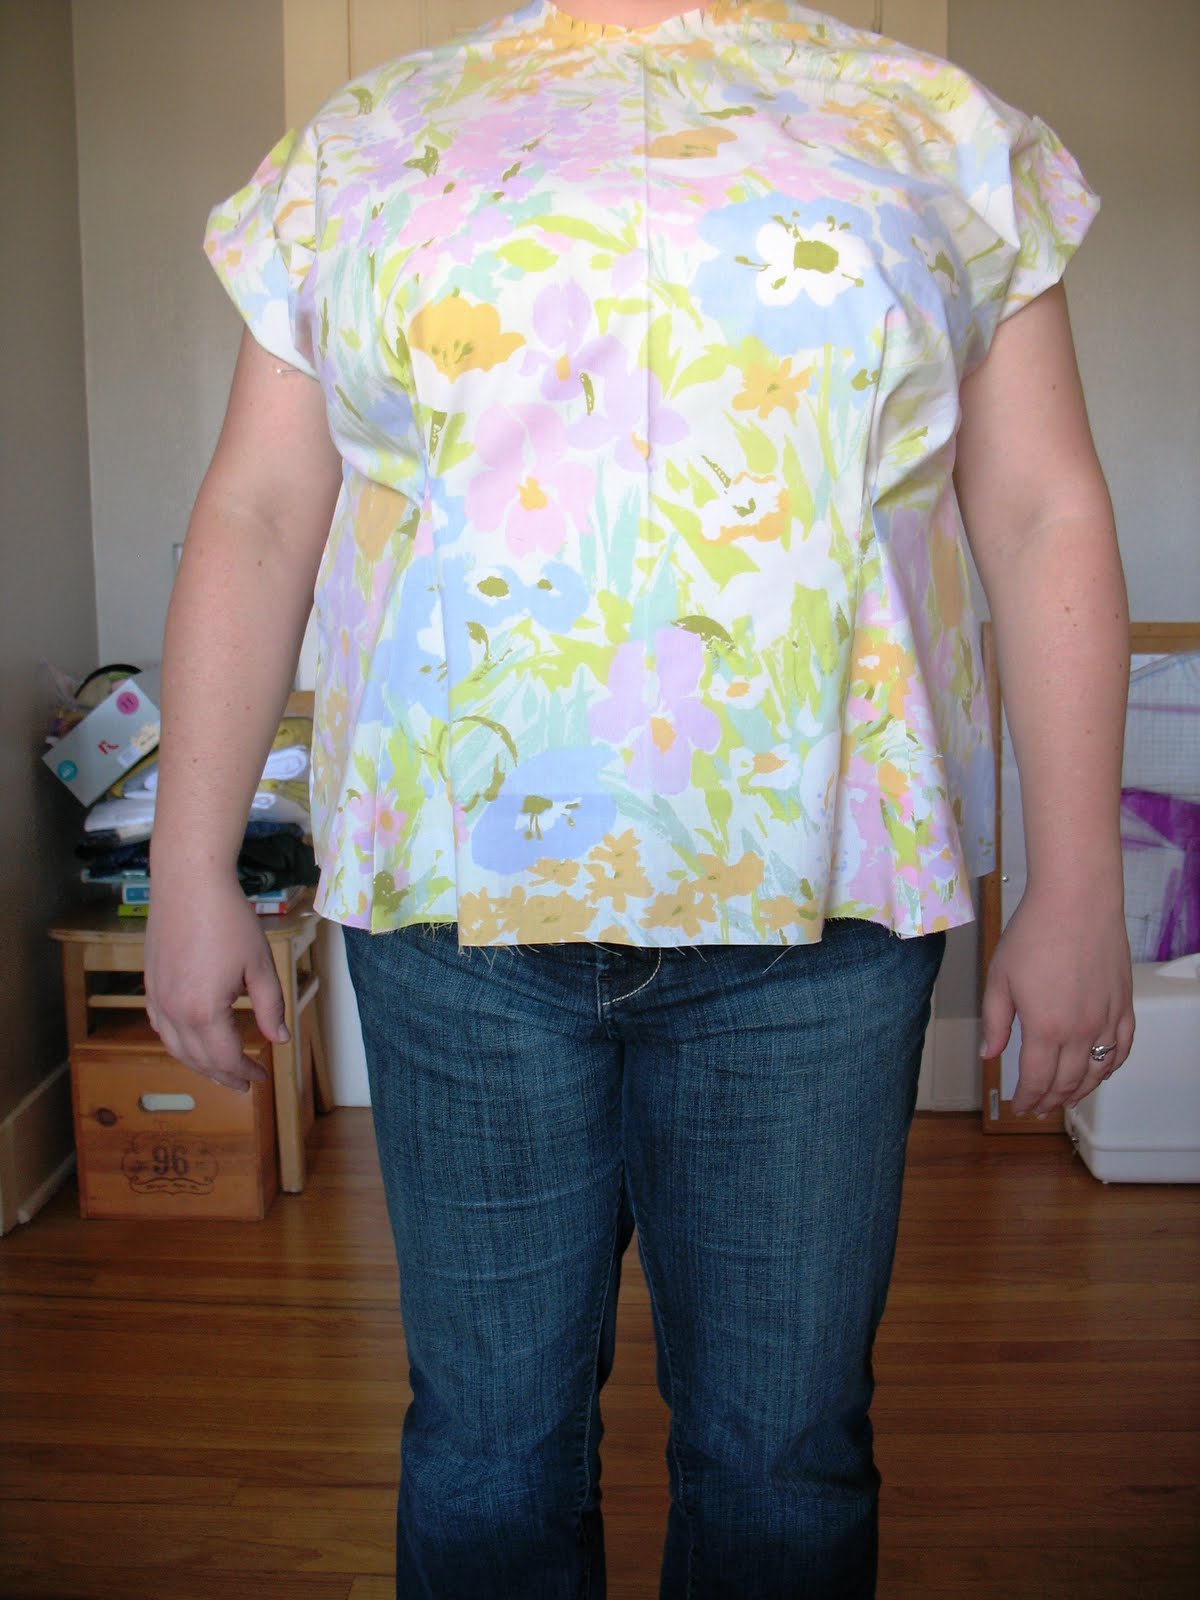
I know that the fabric pattern makes it a bit harder to see the design lines, but I think I can see the drag lines and areas of concern just fine. Perhaps a floral wasn't the correct pattern to sew a muslin with, but who cares? The truth is that the fabric came from two thrifted pillowcases, and I like them. I wish the fit would have been perfect here so I could wear the darn thing. I am going to sew the full process despite the fit errors in hope.

Further alterations that may be in order include:
  • small 1/2 inch forward shoulder adjustment
  • 1/2 tuck "sway chest/hollow chest" across front
  • 1 inch sway back in upper back
  • move center darts closer to center by a few inches, further away from the outside dart
  • redraft darts, taking them in deeper near the hips to eliminate excess
Front:
A lower neckline will be more flattering for sure. And I think unpicking the darts and re-clipping will allow me the flexibility to take them in as much as they need, plus allow me to place them at the most flattering place.

Back:
Not too shabby. It might be pulling a tiny bit at the center back waist, and I do see some fabric puddling in the swayback area. I can fix those.

Right side:
I want to limit some of the excess swinging forward between the darts. It is very maternity-ish. And even though I have a round "maternity-ish" stomach shape, I do not feel the need to dress it as such.

Left side:
Side seem:
I am pleased it seems to be falling evenly along my true side center, see how it matches up with my pants seem? No crazy pulling to the back or front is a good thing.

There are a number of finished Sencha's haunting the blog world that I have been looking at for inspiration and fit guidance. I am especially looking for fuller busted gals as examples. If their Sencha's all wrinkle in the same place mine does, than it must be a normal wrinkle, right?

Friday, November 5, 2010

Sencha Blouse: "Sway Chest" Adjustment question

To fill in the space or not to fill in the space, that is the question... or rather... To trim off the excess wedge or not to trim off the excess wedge, maybe THAT is the question. Bad Shakespeare puns aside, I do question how to finish my "hollow chest" adjustment, or what I am thinking of as my "sway chest" adjustment. I haven't really found an answer online or in my books.

That there above is a two inch tuck taken along my upper bust line, exactly where my breast curve stops and my chest begins. This is where the tissue wanted to be folded, so this is where I folded it. It indeed took me a bit of pondering and staring to figure out to fold this at all. During my fitting, I originally thought the center waist was not big enough, because the center front seam was sweeping out toward my side. As I played with the tissue, I realized the center front was swinging out because the upper chest was too long. If I tucked out some inches from the upper chest, it pulled the center waist into the correct position. Viola. Solution found. Almost...

Now I just need to figure out how to finish off this adjustment to keep things on grain.

This is my first sway chest attempt, although I have high, high hopes for it. You see, I have come to realize that I am indeed short in the upper chest. Too often in ready to wear, especially in blazers and jackets, my shoulder and neckline try to "stand up" off of my shoulders when I sit or relax. Lapels are always gaping away from my upper chest. Even in my fitted t-shirts, I get wrinkles and "puddles" of fabric over my bust. It's because my clothing is too long up there!!! I never thought much of it, but now I am starting to understand that I am wearing clothing that has been graded in length, not just width, to match my size. And I don't need extra length in my upper chest and shoulder area. I am short there.

Hence comes in the question. The "sway chest" tuck left an inverted curve in the center front chest area. So, do I fill it in? Or do I trim off the little wedge the is poking over the majority of the center front line. Both options are demonstrated below.

The "Trim off" Method:

See that extra wedge of pattern? I could trim that off to true the center front on a consistent grain line. But this will diminish the overall width at the center front a little bit.

The "Fill in" Method:
See that triangle gap in the pattern? I could fill that in to true the center front on a consistent grain line. This will add some width to the center front.

Being fairly new to sewing, I am a bit concerned what all these alterations are doing to the potential grain lines in my fabric. Heaven knows I don't want things stretching all wonky along the bias because I shifted the lines. But hey, trial and error is a great way to learn!